Installation
Intruction
Install on Linux
Install on Kubernetes
Related Tools
Cluster Operation
Quick Start
Cluster Admin Guide
Multi-tenant Management
Platform Management
Infrastructure
Monitoring Center
User Guide
Storage
Configuration Center
Project Settings
Development Guide
API Documentation
Building a Pipeline based on GitLab and Harbor
KubeSphere Installer integrates Harbor and GitLab. Build-in Harbor and GitLab are optional for installation and they need to be opened before being installed. Users can determine the installation according to team projects' requirements, which will be easier to manage projects' images and codes. This guide can be used to build offline pipelines.
Objective
This guide will show how to create pipelines through Jenkinsfile built in the GitLab repository. There are 7 stages in the pipeline. Firstly, images will be created from source codes in GitLab. Then images will be pushed to Harbor's private repository. Finally, deploy "Hello,World!" to Dev and Production environments in the KubeSphere cluster. And the deployment is accessible through public networks. The two environments mentioned above is resource separated by Namespace underlying Kubernetes.
Prerequisite
This guide takes GitLab and Harbor as examples. Please confirm the installation of build-in Harbor and build-in GitLab and ready basic image of java:openjdk-8-jre-alpine.
Hand-on Lab
Pipeline Overview
The flowchart below illustrates the pipeline's entire workflow:
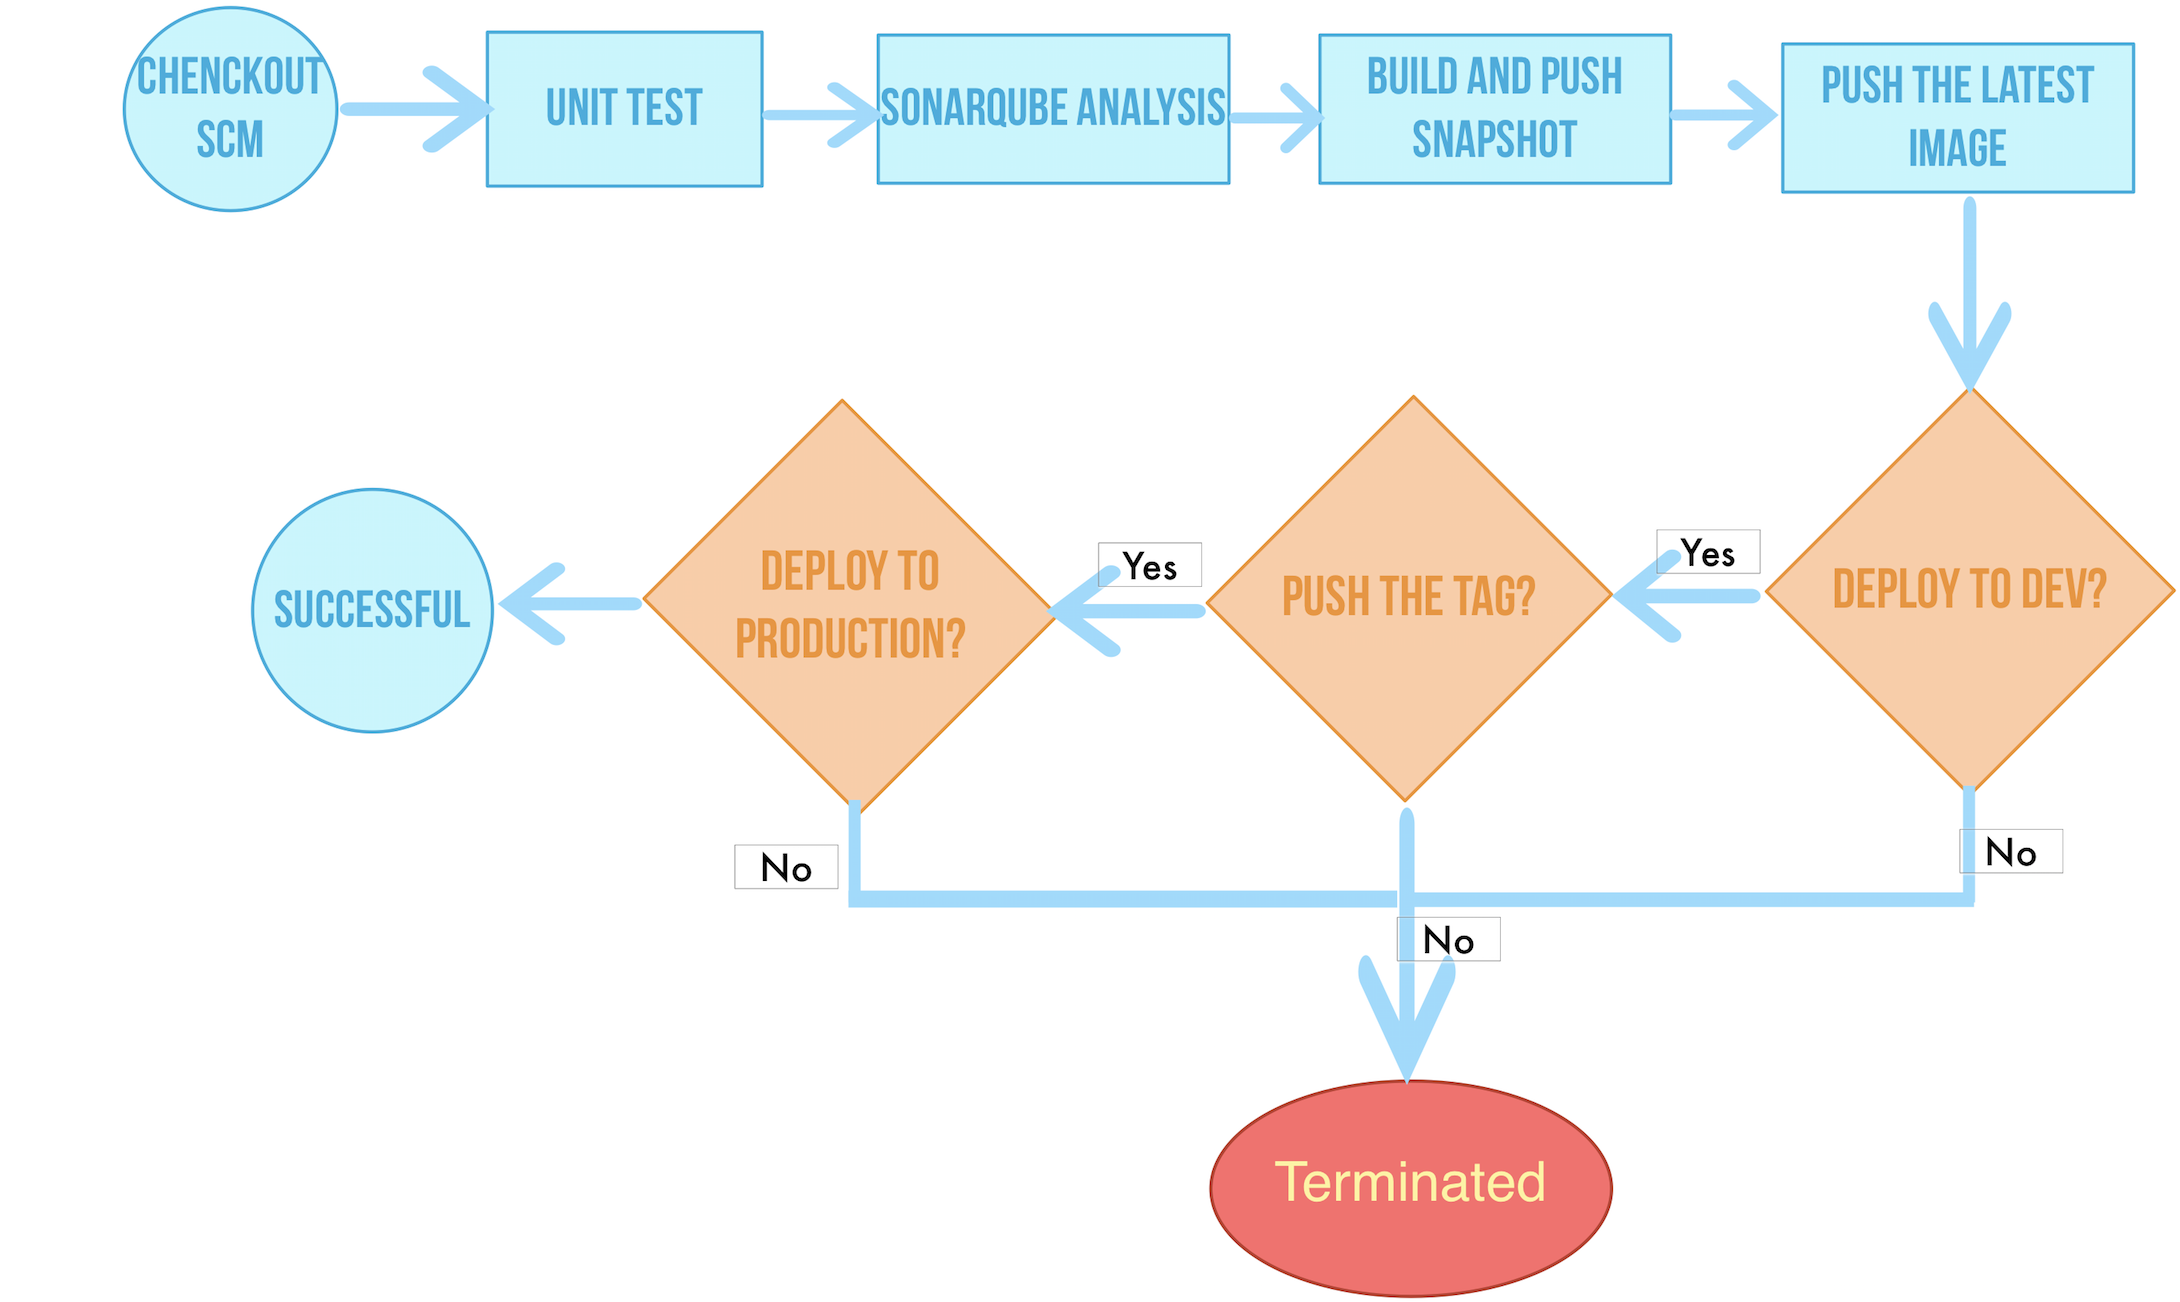
Workflow:
- stage 1. Checkout SCM: Pull GitLab repository codes.
- Stage 2. Unit test: Proceed the following jobs only unit tests have been passed.
- Stage 3. sonarQube analysis: sonarQube Code check.
- Stage 4. Build & push snapshot image: According selected branches from the behaviour strategy to build images. Set the tag as
SNAPSHOT-$BRANCH_NAME-$BUILD_NUMBERand push the tag to Harbor ($BUILD_NUMBERis the running code in the pipeline's activity list).- Stage 5. Push latest image: Tag the master branch as the latest and push it to Harbor.
- Stage 6. Deploy to dev: Deploy master branch to the Dev environment. This stage requires review.
- Stage 7. Push with tag: Generate tag, release it on GitLab and push the tag to Harbor.
- Stage 8. Deploy to production: Deploy the published tag to the Production environment.
Basic Settings
Step 1: Edit CoreDNS's Settings
Configure the DNS service of the KubeSphere cluster through the hosts plug-in of CoreDNS, so that the external service can be accessed through the hostname domain name inside the cluster.
Step 2 : Upload Basic Images to Harbor
Then upload a base image java:openjdk-8-jre-alpine to Harbor.
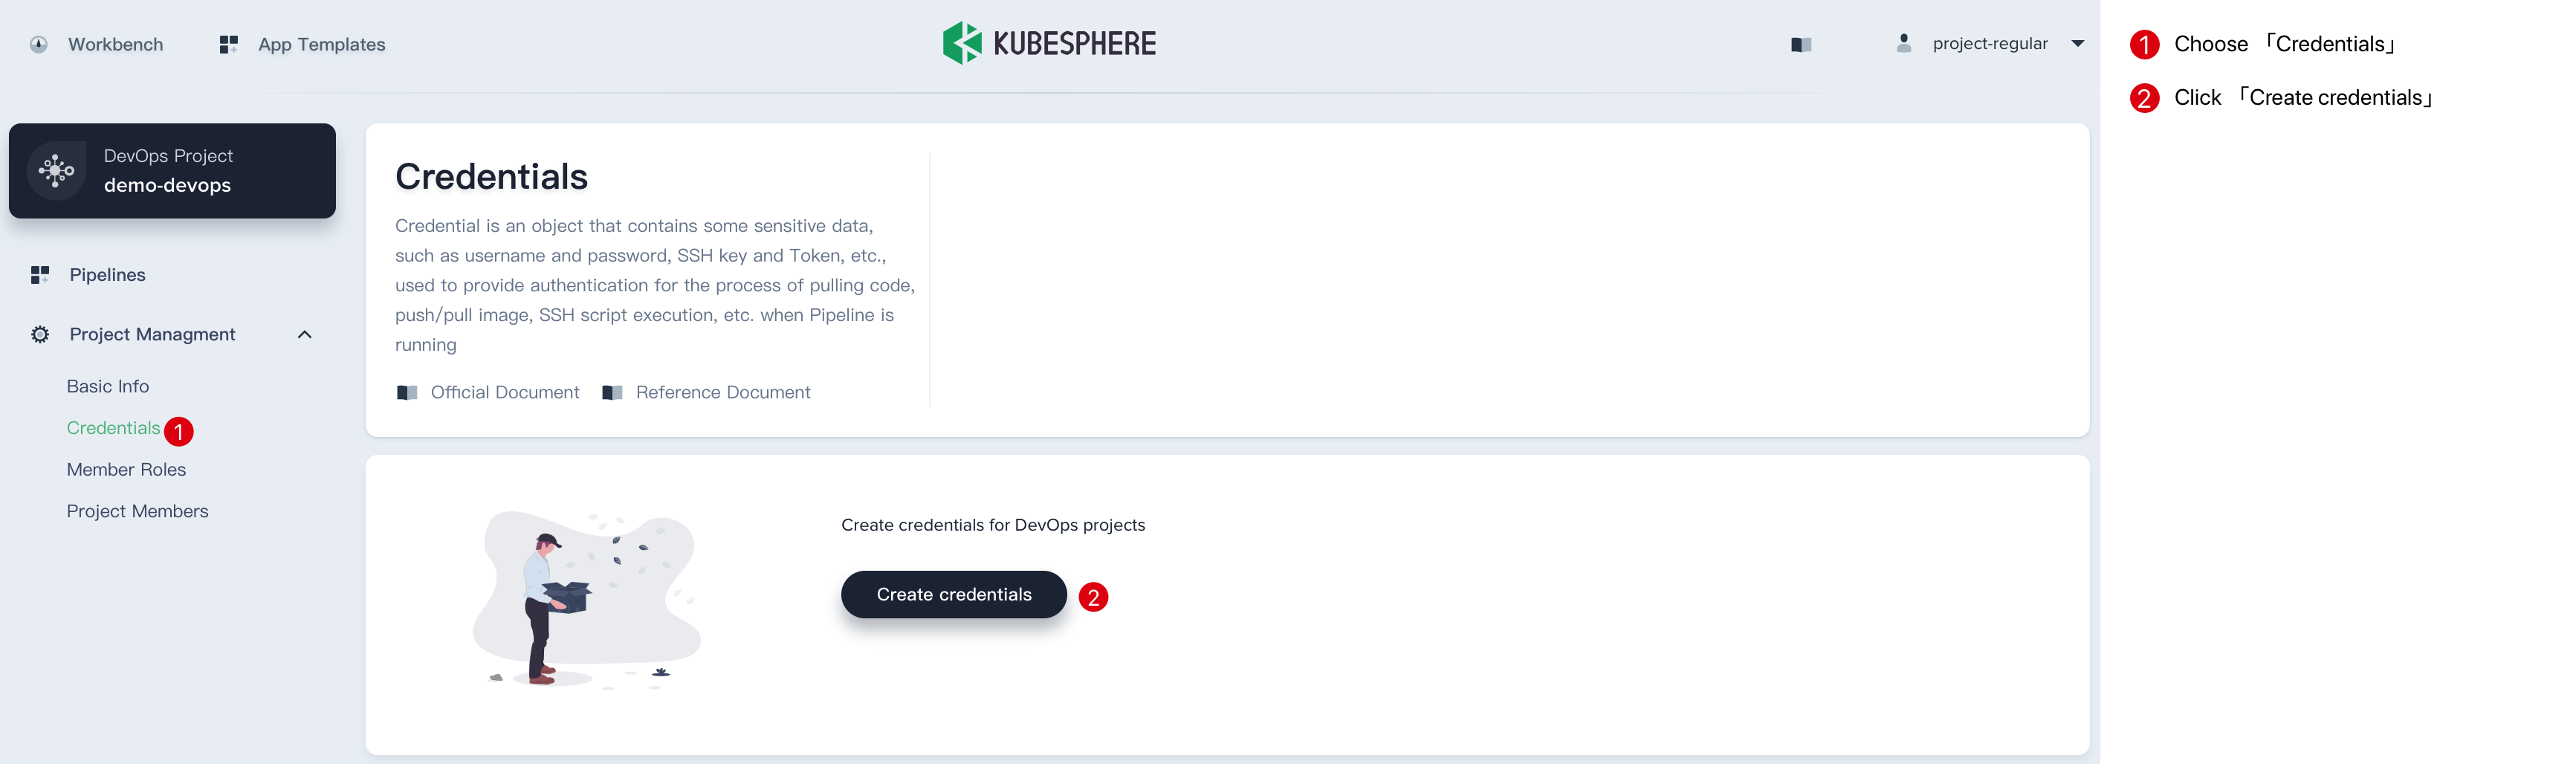
Create Credentials
Log in to KubeSphere using the project common user project-regular, enter the created DevOps project, and start creating the credential.
-
The Jenkinsfile in this sample code repository requires three credentials, such as Harbor, GitLab, and Kubernetes (kubeconfig is used to access the running Kubernetes cluster). These three credentials are created in turn by creating credentials.
-
Then visit SonarQube and create a Java's Token, copy it.
-
Finally, in the DevOps project of
devops-demoin KubeSphere, similar to the above steps, click create under credential to create asecrete textcredential as the above step. Name the credential ID as sonar-token. The key is the token information copied in the previous step. Click confirm when it's done.
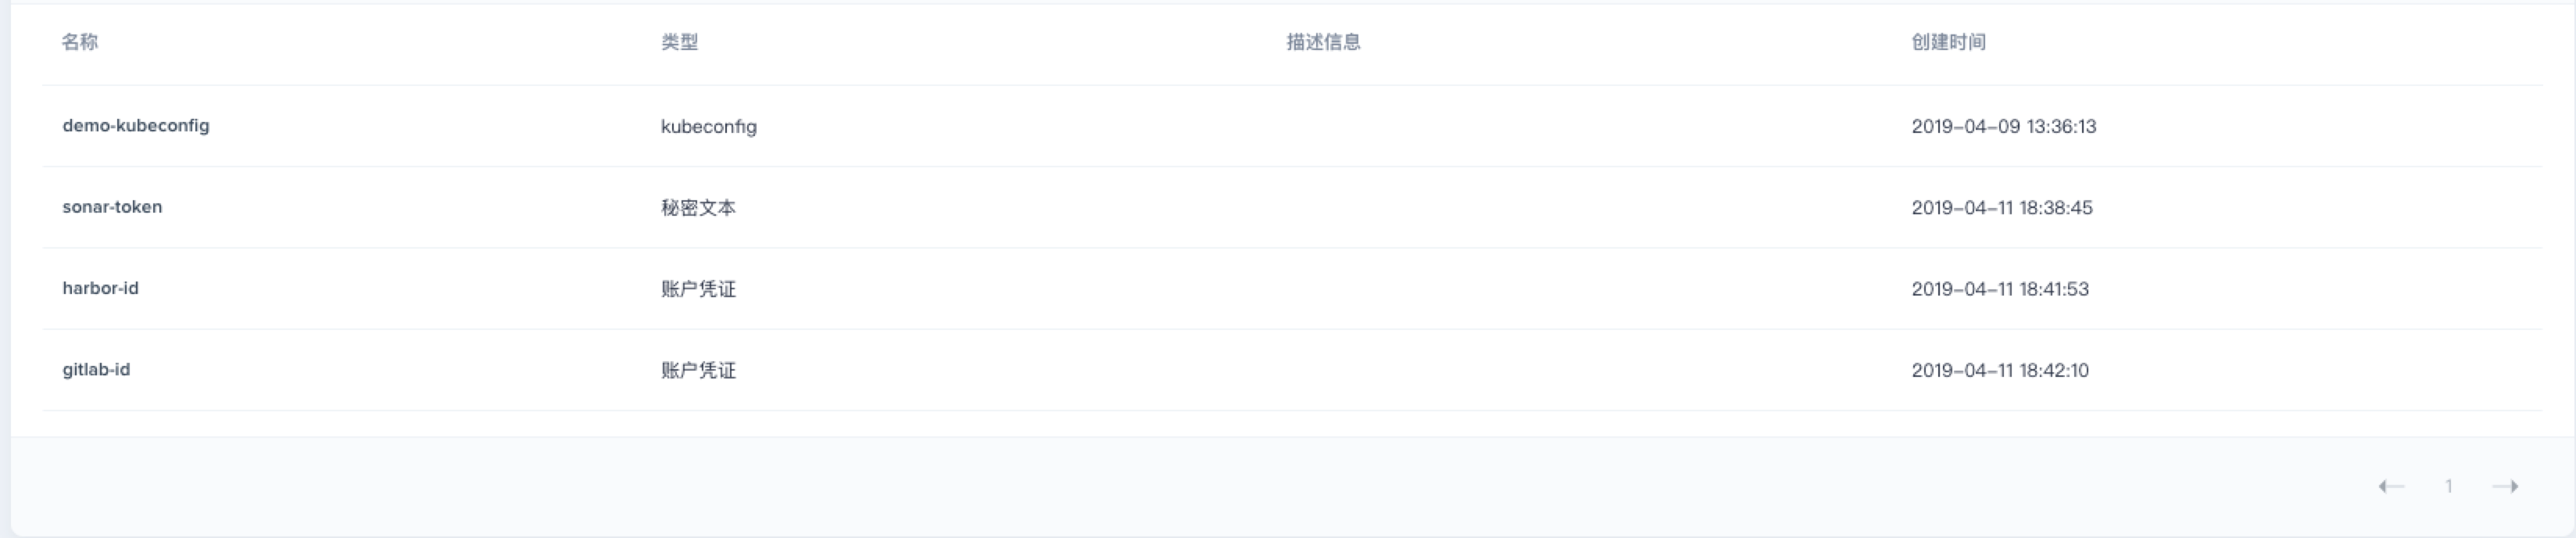
At this point, 4 credentials have been created. The next step is to modify the corresponding four creatives IDs for the user-created credential ID in the jenkinsfile sample repository.
Edit Jenkinsfile
Step 1: Enter into the Project
- According to the requirements in the preconditions, the
devops-java-samplein GitHub should be correctly imported into GitLab.
Note: If you cannot import from GitHub due to network restrictions, please clone it to another server and upload it to the GitLab repository. The name of the repository should be the consistent.

- Click into the project.
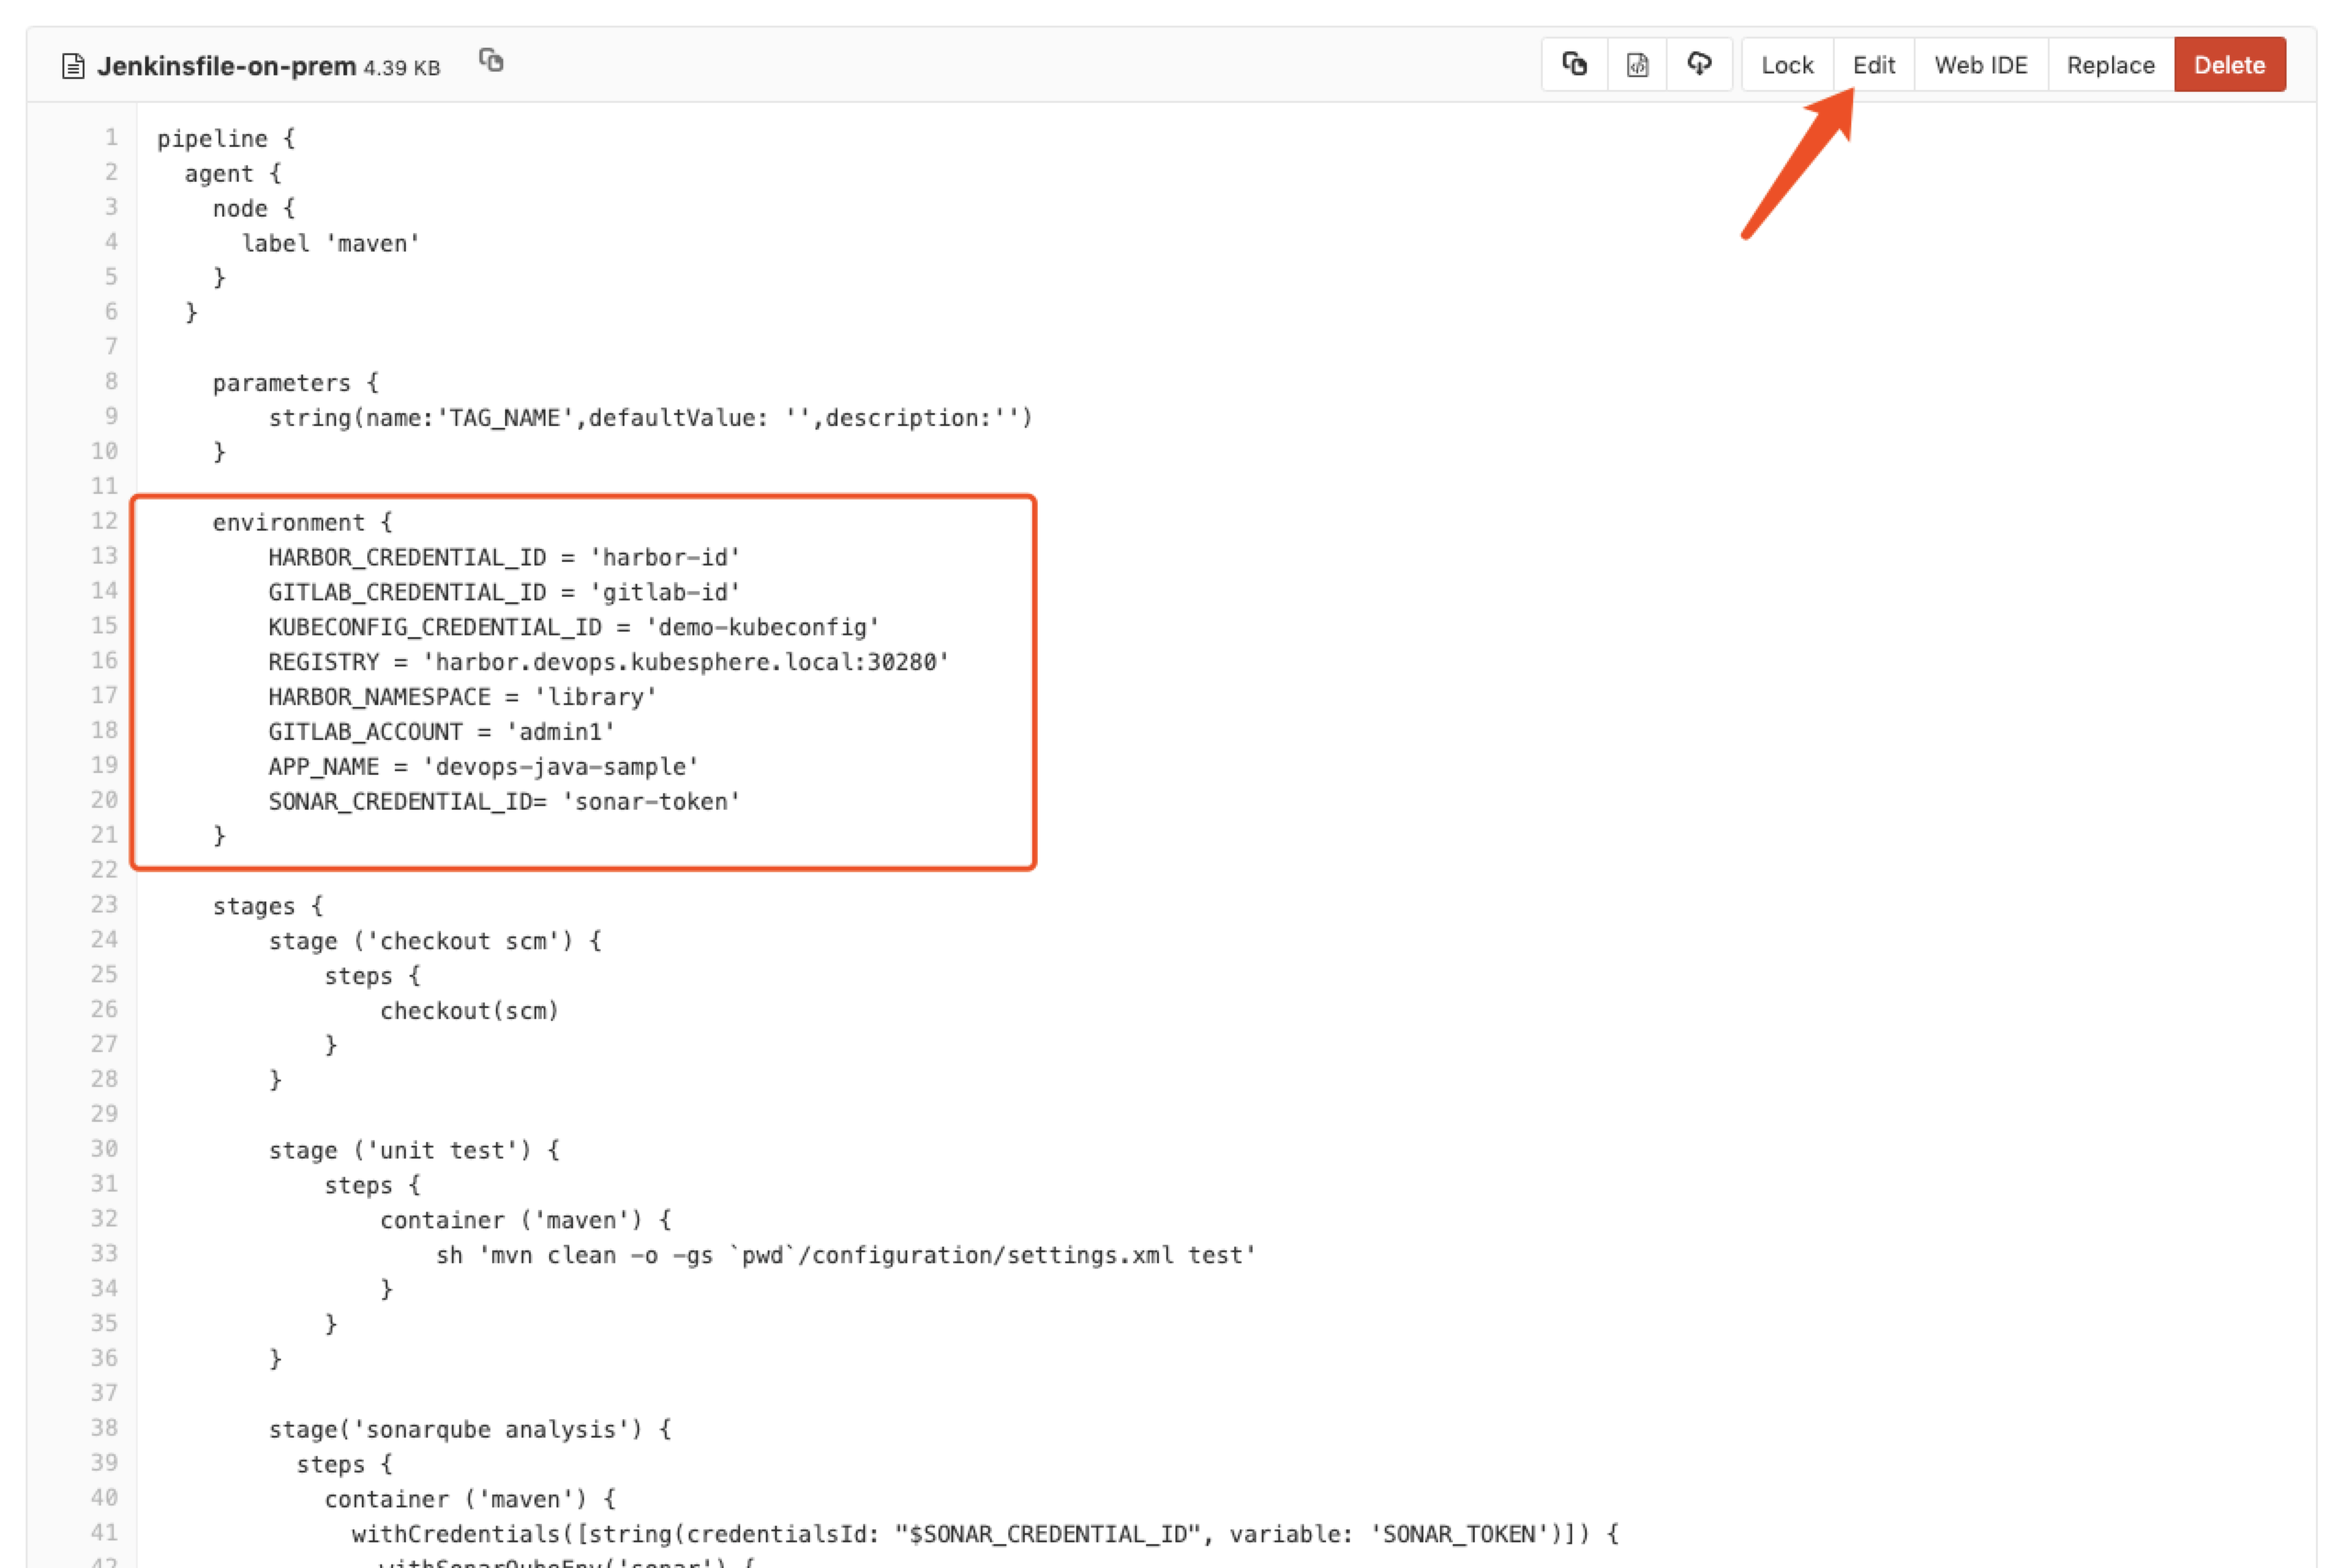
Step 2: Edit Jenkinsfile
- Enter into Jenkinsfile-on-prem **from **Root Directory.

- Click
Editat GitLab UI. You need to edit the following environments' variables.
| Editting Items | Value | Description |
|---|---|---|
| HARBOR_CREDENTIAL_ID | harbor-id | Fill in the Harbor credential ID in the create credential step to log in to your Harbor repository |
| GITLAB_CREDENTIAL_ID | gitlab-id | Fill in the GitLab credential ID in the create credential step for the push tag to the GitLab repository |
| KUBECONFIG_CREDENTIAL_ID | demo-kubeconfig | Kubeconfig credential ID for accessing a running Kubernetes cluster |
| REGISTRY | harbor.devops.kubesphere.local:30280 | Use Harbor as the domain name by default for pushing images. |
| HARBOR_NAMESPACE | library | The default is the library project under Harbor, which can change the project name according to the actual situation. |
| GITLAB_ACCOUNT | admin1 | Set the GitLab user as admin1 by default. |
| APP_NAME | devops-docs-sample | Application Name |
| SONAR_CREDENTIAL_ID | sonar-token | Fill in sonarQube token credential ID when creating the credentials for code quality check. |
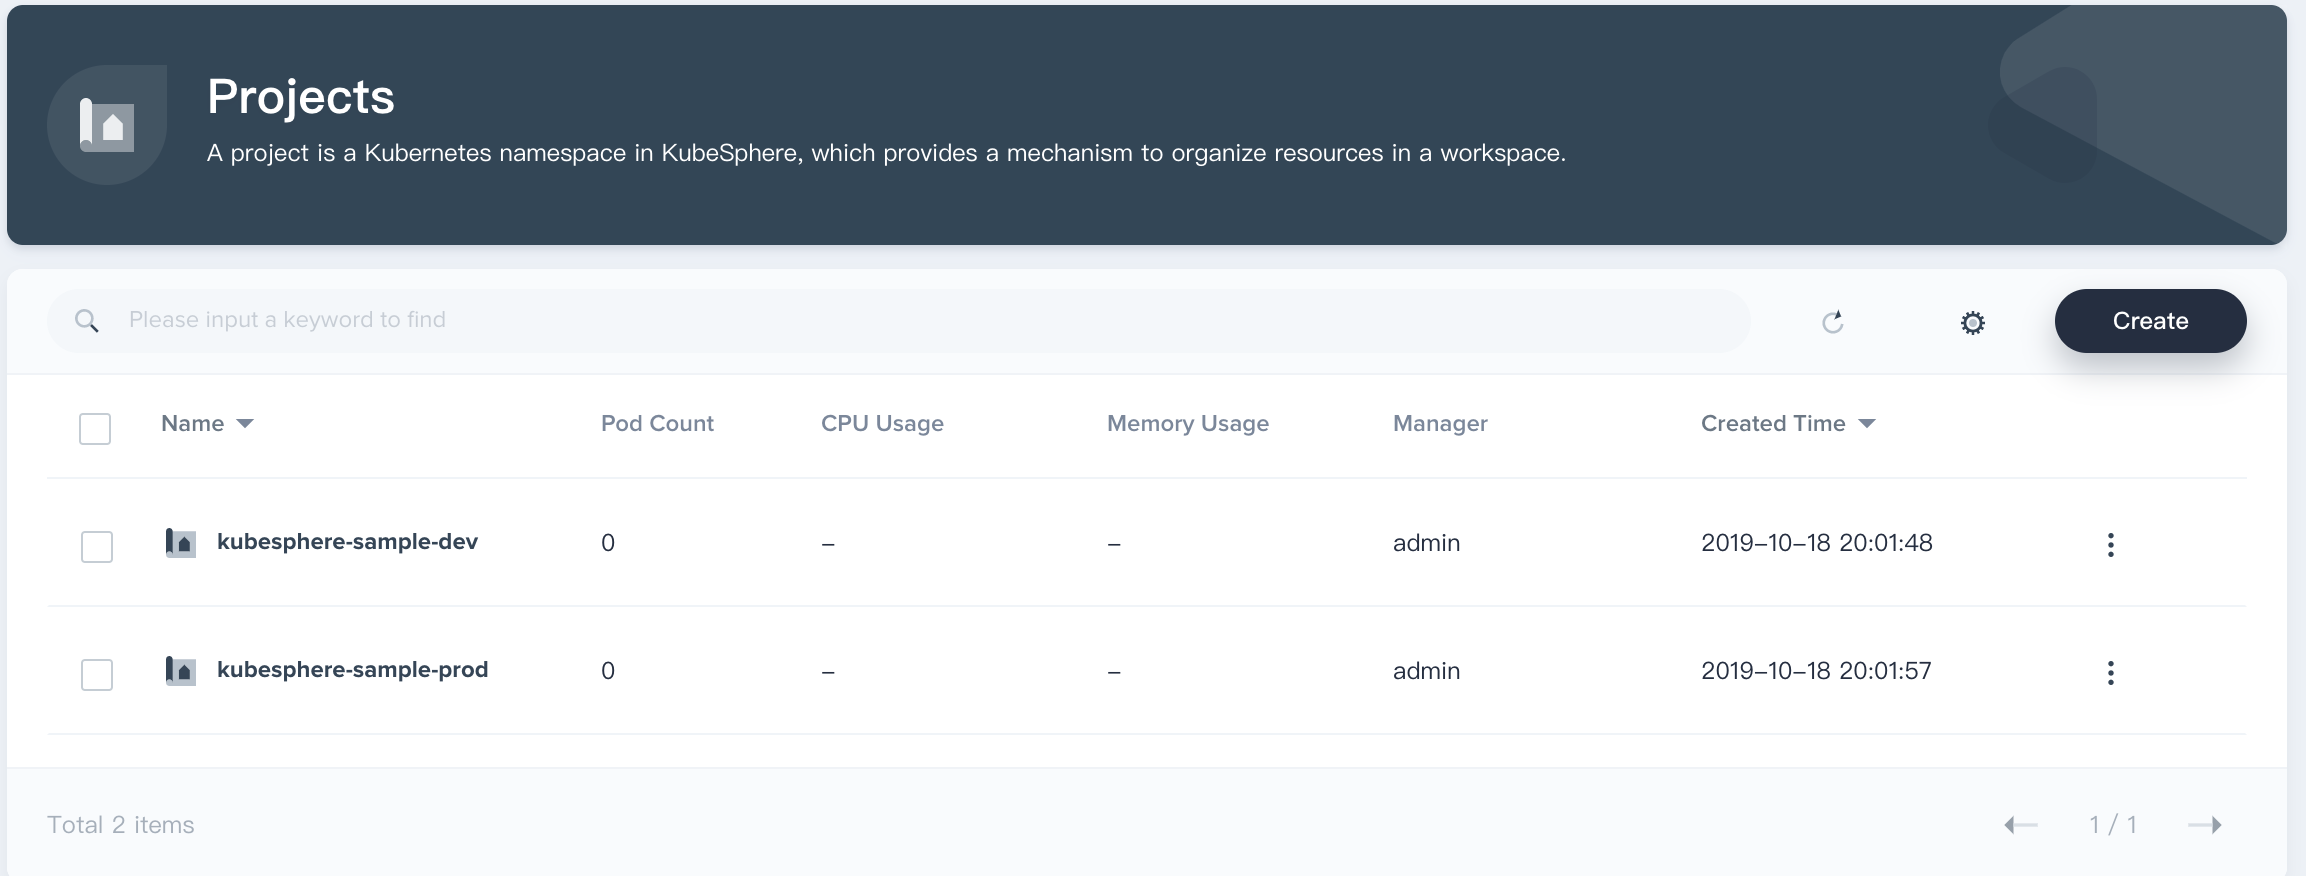
Create Two Projects
The CI/CD pipeline will eventually deploy the examples to the Dev and Production (Namespace) environments based on the sample project's yaml template.
The projects' names are kubesphere-sample-dev and kubesphere-sample-prod. These two projects need to be created in advance, refer to Building a pipeline based on the Spring Boot project - create a project to create.
Create Pipelines
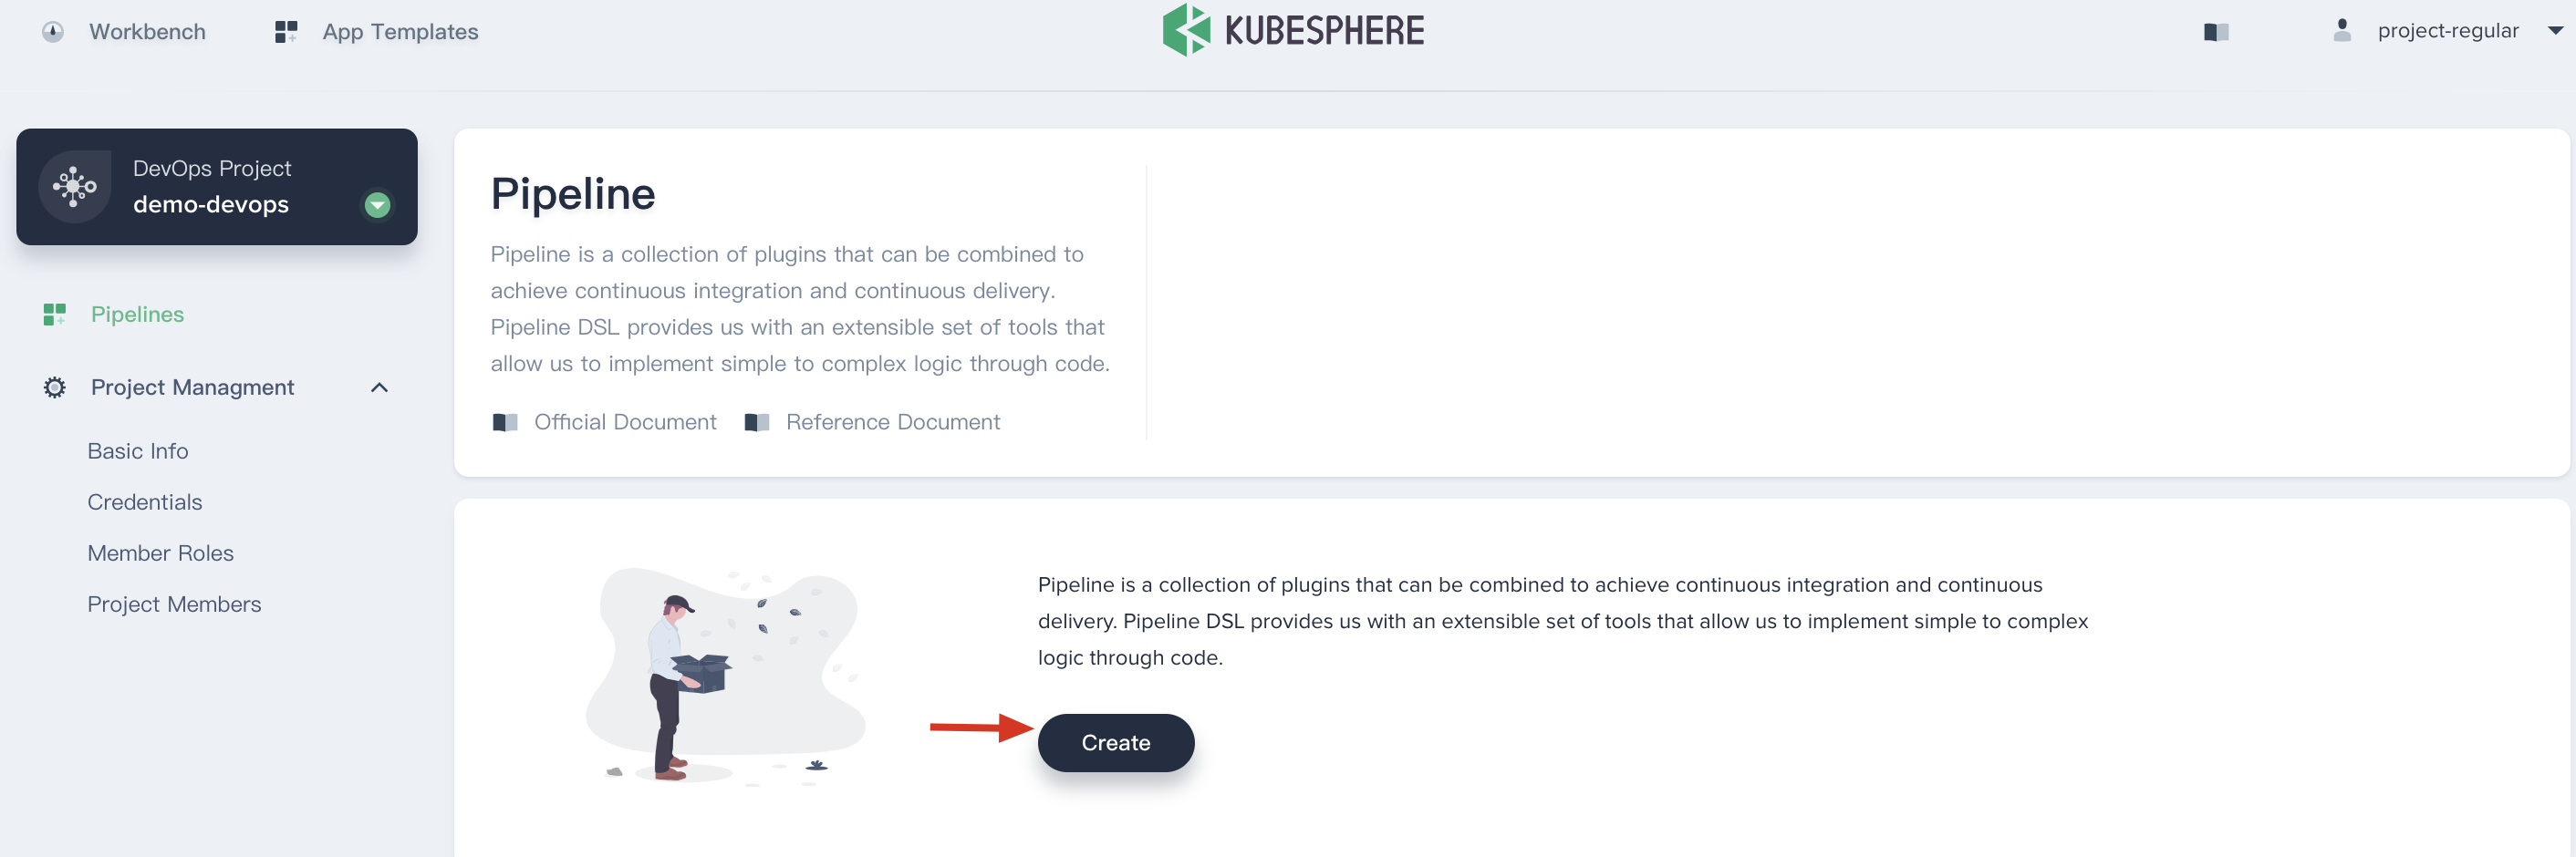
Step 1: Fill in Basic Information
- Enter into the created DevOps project, select the pipeline in the left menu bar, and click Create.
-
In the pop-up window, input the basic information of the pipeline.
-
Name: Give it an easy name to be understood and searched.
-
Description: Simply describe the pipeline's main features for further knowledge of the pipeline's functions.
-
Code repository: Select code repository which should exist in Jenkinsfile.

Step 2: Add Git Repository
- Click code repository. Take the GitLab repository as an example.
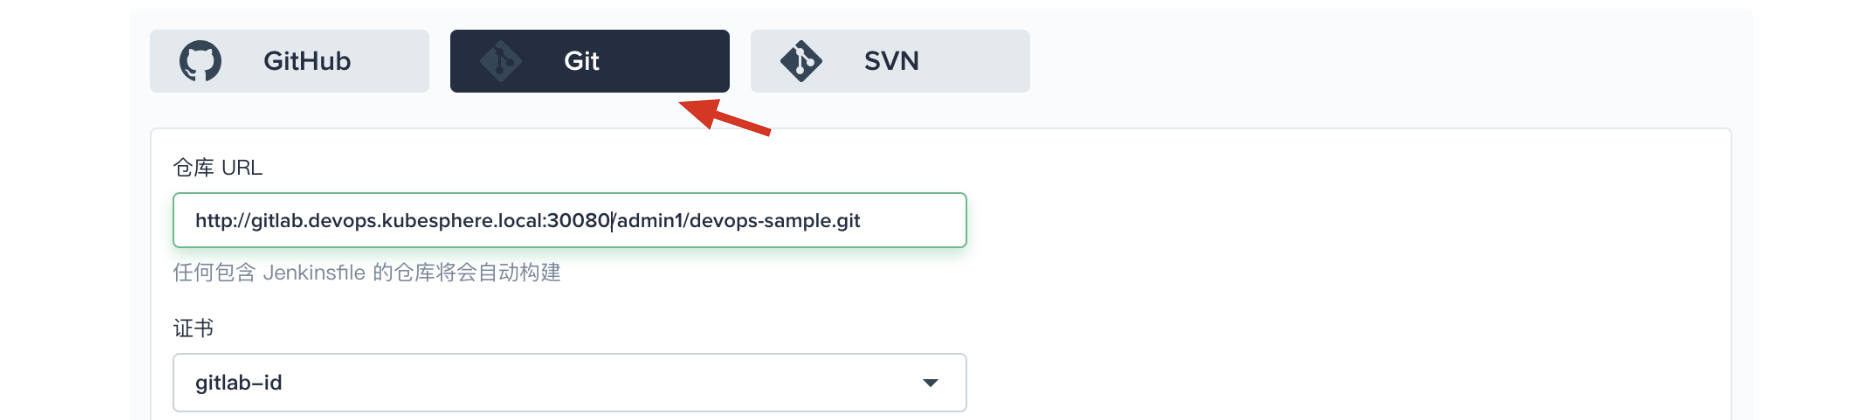
- Input the repository's URL by default:
http://gitlab.devops.kubesphere.local:30080/admin1/devops-java-sample.git,
Note: There are errors in HTTP and SSH URI in the GitLab. HTTP URI needs manual port code of 30080. SSH URI needs to be added with the protocol ssh:// and the port code: 30090 manually.
Create gitlab-id before selecting the certification.
Click 「Save」 to proceed.
Step 3: Advanced Settings
After completing the code warehouse related settings, enter the advanced settings page. Advanced settings support the construction record of the pipeline. Customization of behavioural policies, periodic scans, etc. The following is a simple definition of the relevant configuration used.
- In the build settings, check to discard the old build, where the number of days to retain the branch and the maximum number of reserved branches default to -1.

-
The default script path is Jenkinsfile and needs to be modified to
Jenkinsfile-on-prem.Note: The path is the path of the Jenkinsfile in the code repository, indicating that it is in the root of the sample repository. If the file location changes, you need to modify its script path.
- When scanning** Repo Trigger** check
If there is no automatic scanning, scan regularly. The scanning time can be customized according to the team preference. The example here set it as5 minutes.
Note: Regular scaning is to set a cycle to require the pipeline scan remote repositories regularly. According to the **Behaviour Strategy **to check whether there is a code update or a new PR.
Webhook Push: Webhook is a high-efficiency way to detect the changes in the remote repository and automatically activate new operations. Webhook should play the main role in scanning Jenkins for GitHub and Git (like Gitlab). Please refer to the cycle time setting in the previous step. In this sample, you can run the pipeline manually. If you need to set automatic scanning for remote branches and active the operation, please refer to Setting automatic scanning - GitHub SCM. 设置自动触发扫描 - GitHub SCM。
Complete advanced settings and click Create.

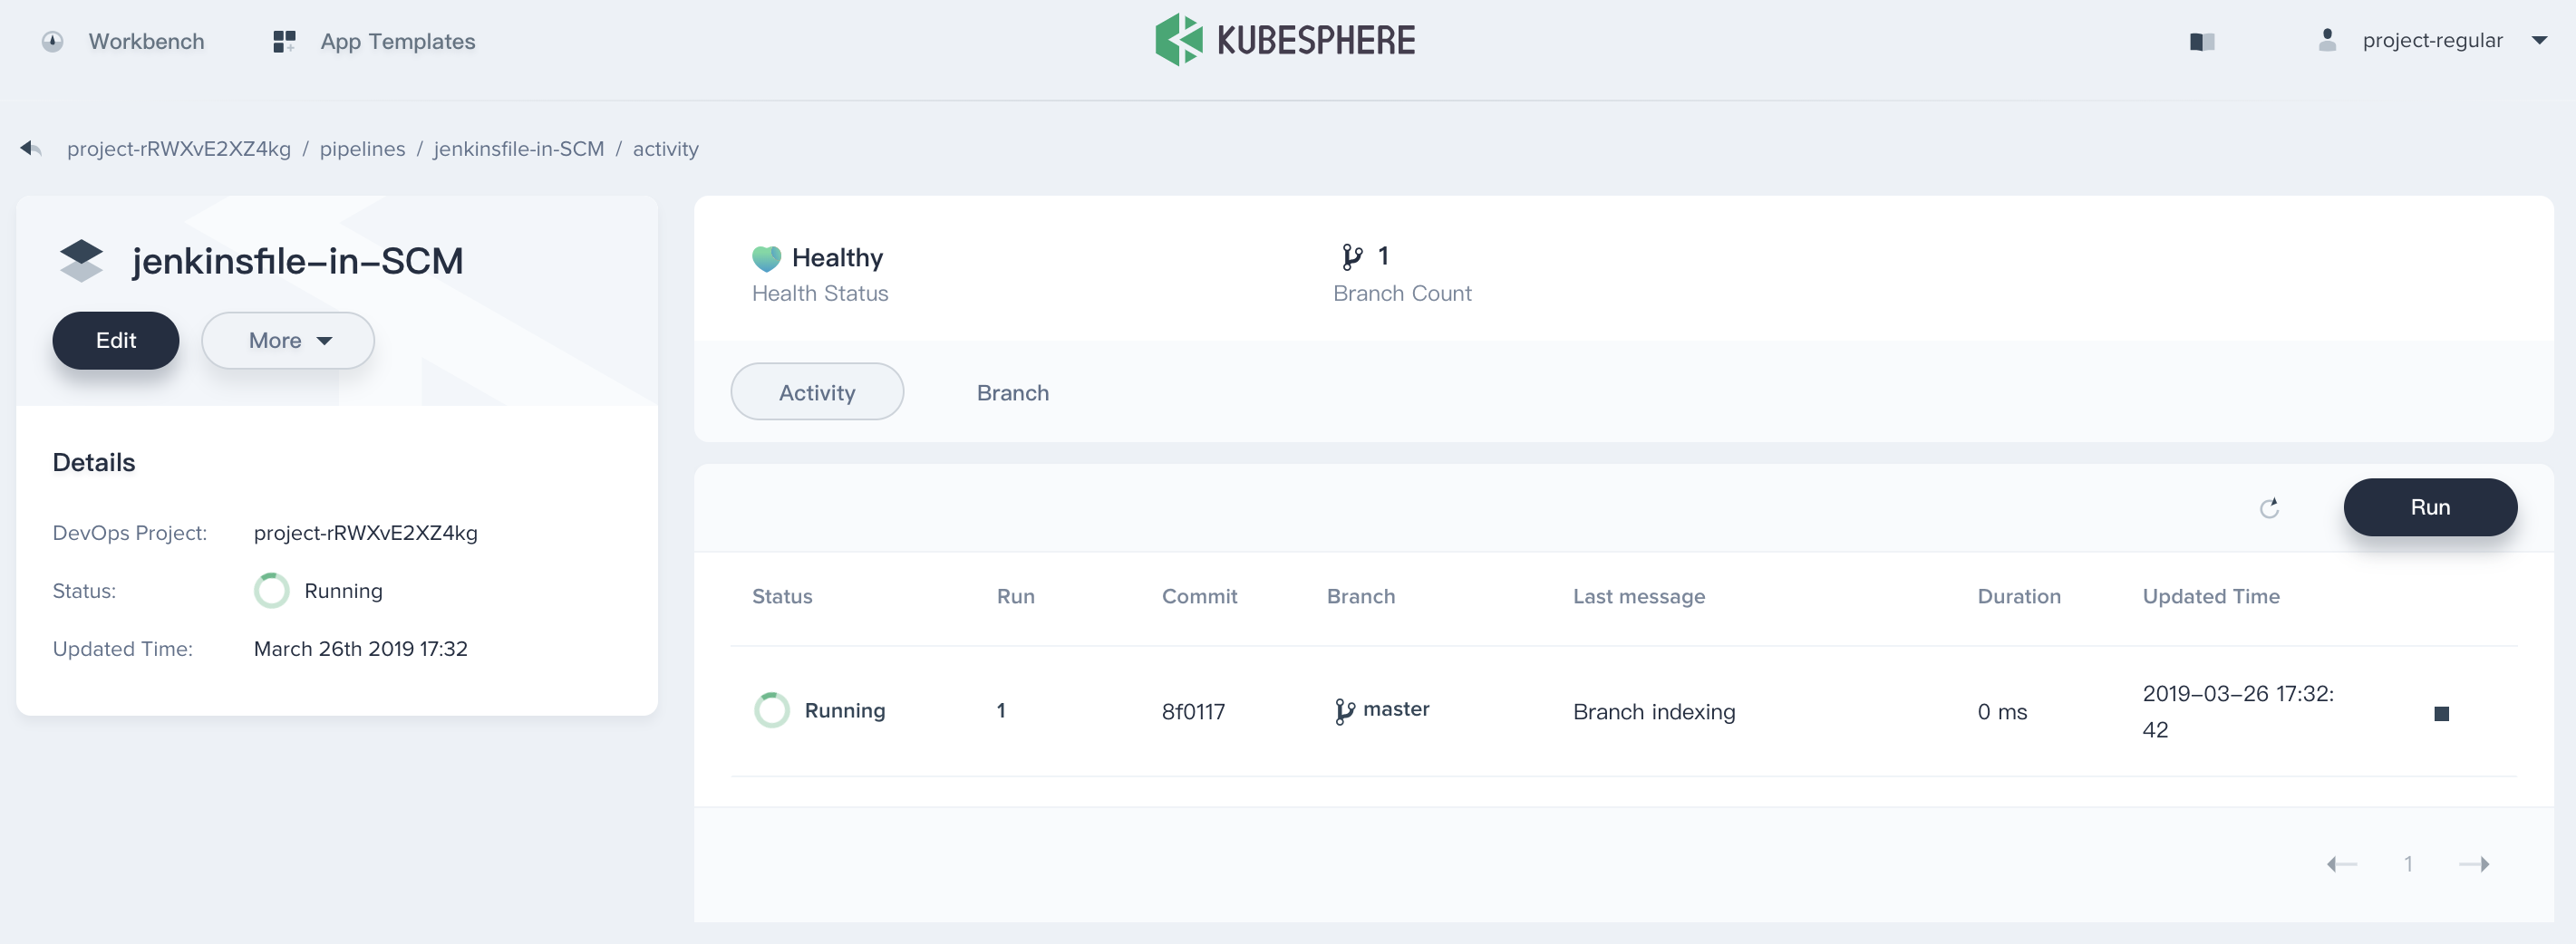
Step 4: Pipeline Operation
After the pipeline is created, click the browser's refresh button to see a log of the auto-triggered remote branch.
-
Click Run on the right. According to the Behaviour Strategy, scan branches from the code repository automatically. Then build the pipeline's
masterbranch in the pop-up window. The system will upload Jenkinsfile-online according to the input branch (The default option is the Jenkinsfile). -
Since there is no default option for
TAG_NAME: defaultValuein Jenkinsfile-online, put in a tag number in theTAG_NAMEsuch as v0.0.1. -
Click confirm to start a new pipeline activity.
Note: Tag is used to generate release and images with tags. Besides, when the main pipeline is released,
TAG_NAMEshould not duplicate the existingtagnames in the code repository. If the repetition occurs the pipeline cannot run.

For now, the pipeline has been built and started to run.
Note: Click branch to switch to the branch list to see which branches are running based on which branch, the branch here depends on the discovery branch strategy of the previous behaviour strategy.
Step 5: Review the Pipeline
For the convenience of demonstration, the current account is used for review by default. When the pipeline is executed to the input step, the status will be suspended. You need to manually click continue, and the pipeline can continue to run. Note that three stages (stages) are defined in Jenkinsfile-on-prem for deployment to the Dev environment and the production environment, as well as the push tag. Therefore, in the pipeline, you need to audit the three stages of deploy to dev, push with tag, deploy to production three times. If you do not review or click to terminate, the pipeline will not continue to run.
Note: In actual development and production scenarios, administrators or operations personnel with higher authority may be required to review the pipeline and images. They will also decide whether to push the pipeline and images to code repository or image registries, to deployment development or production environment. The
inputstep of Jenkinsfile supports specific users to review the pipeline. For example, to specify a user named project-admin for auditing, you can append a field to the input function of Jenkinsfile. If it is multiple users, separate them with commas, as shown below:
···
input(id: 'release-image-with-tag', message: 'release image with tag?', submitter: 'project-admin,project-admin1')
···
Check the Pipeline
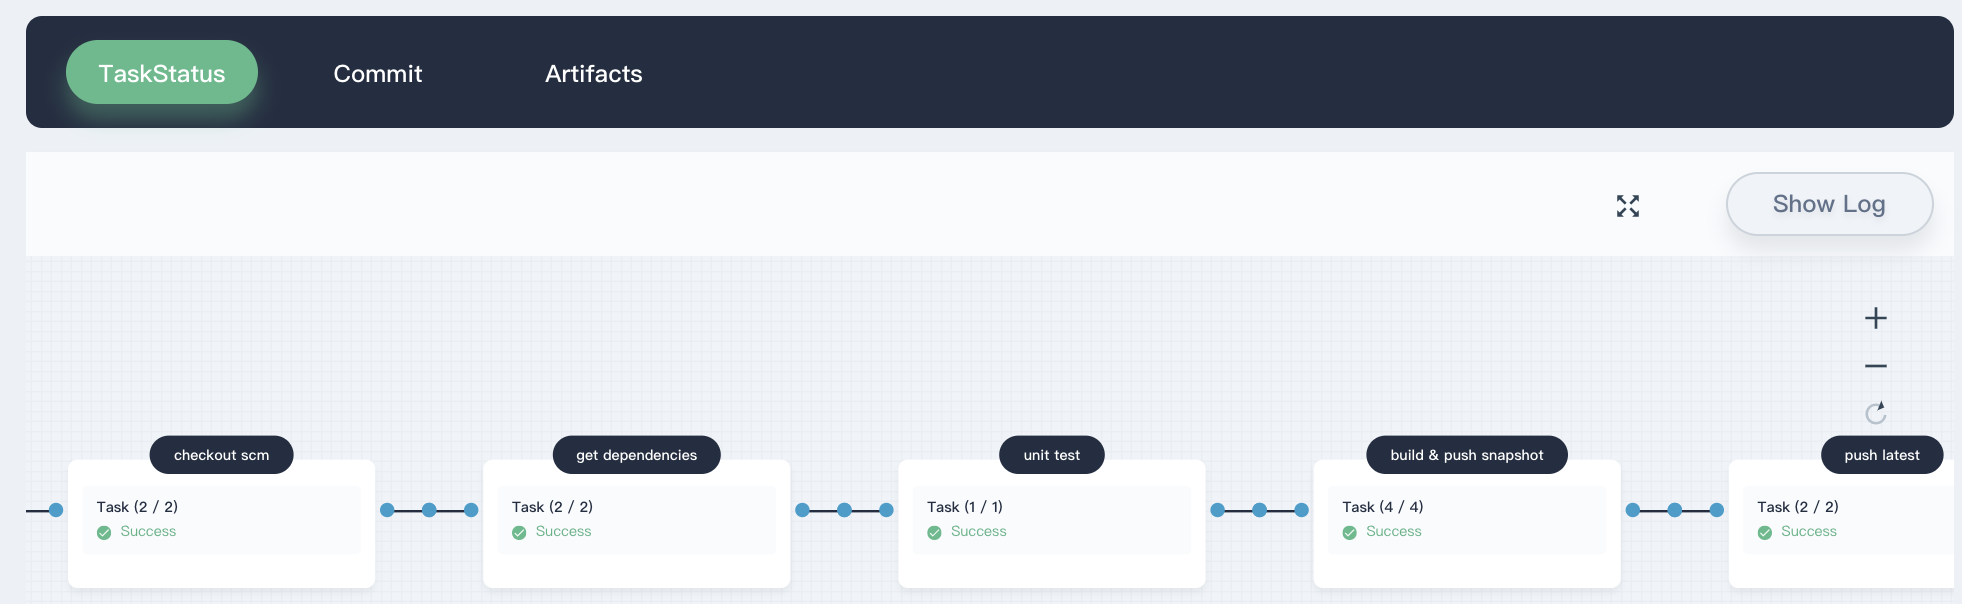
- Click on the serial number of the currently running pipeline under the
Activitylist in the pipeline. The page shows the running status of each step in the pipeline. Note that the pipeline is initially initialized when it is created, and only the log window may be displayed. After about one minute, you can see the pipeline. The black boxes tag the pipeline's step names. The 8 stages in the sample pipeline have been defined in the Jenkinsfile-on-prem.
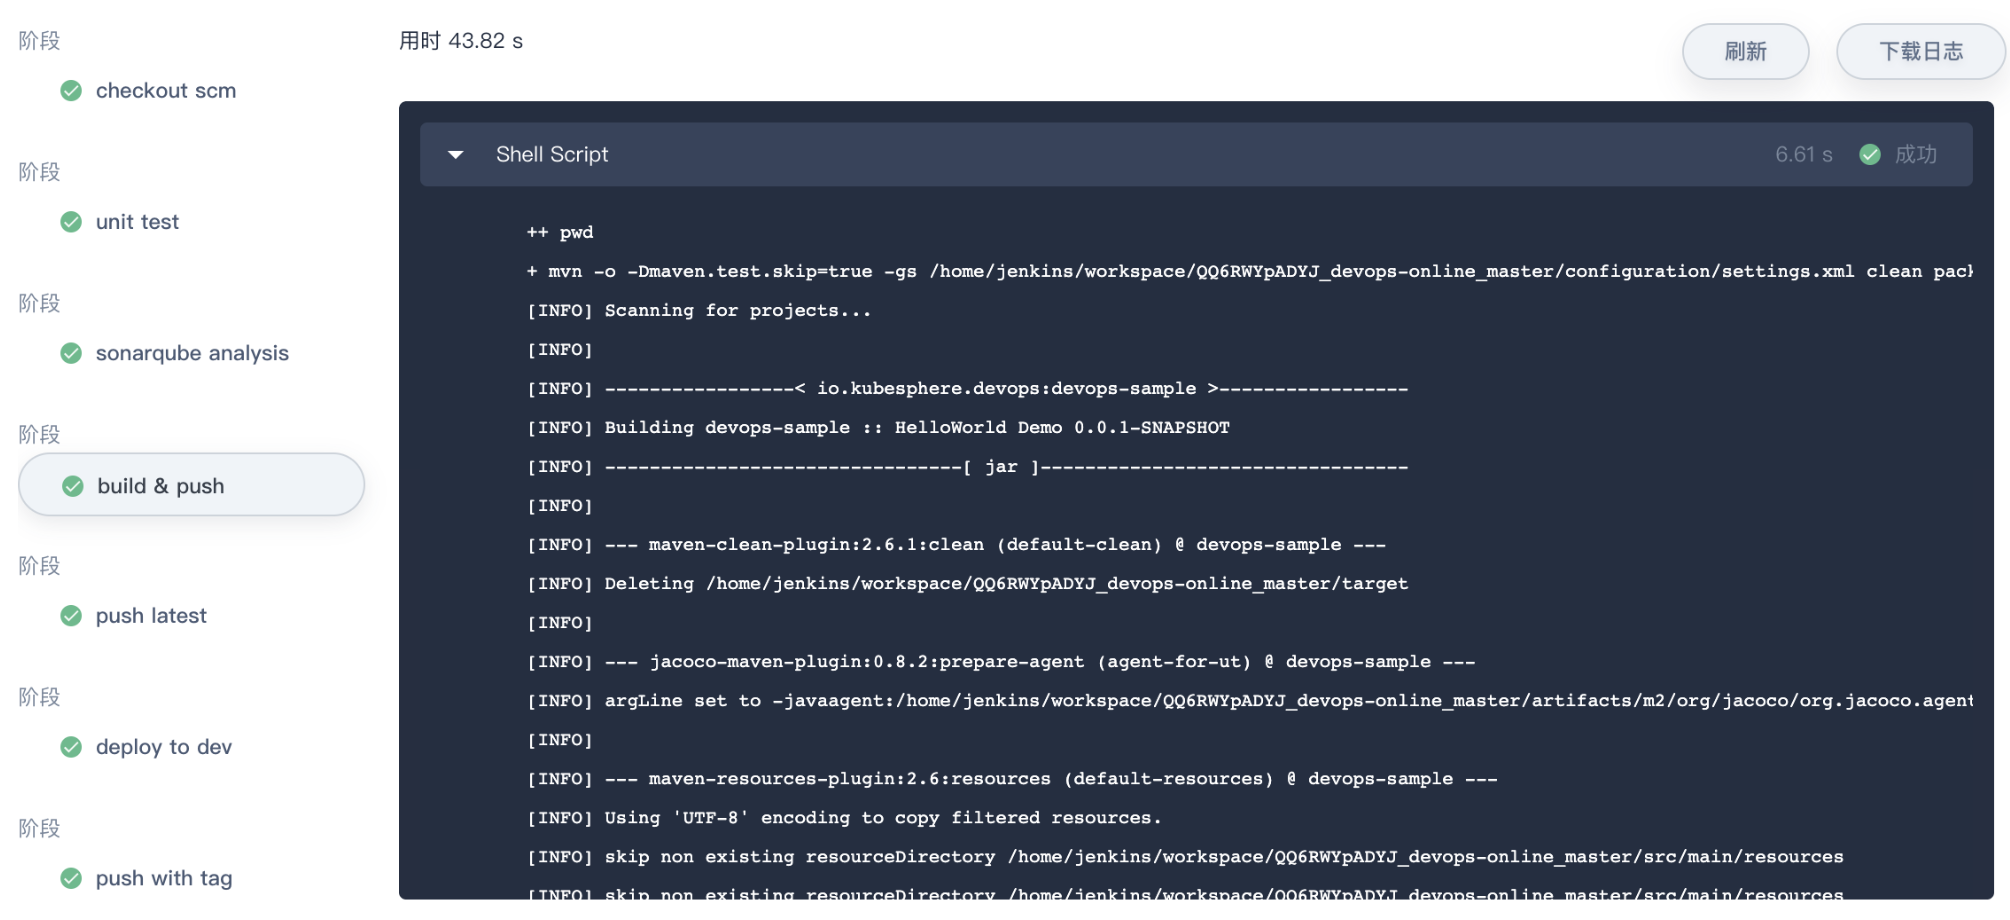
- Click
Checking the logat the top right corner to check the pipeline's operation log. The page shows the specific log, running status and time of each step. Click on a specific stage on the left to expand its specific log. Logs can be downloaded to the local; if there is an error, download to the local is more convenient to analyze the positioning problem.
Check Results
- If the pipeline is successfully executed, click on the
code qualityunder the pipeline to see the code quality test result through sonarQube, as shown below (for reference only).
- The Docker image of the final build of the pipeline will also be successfully pushed into Harbor. We have already configured Harbor in Jenkinsfile-on-prem. Log in to Harbor to see the image push results. You can see that the image with the tag snapshot, TAG_NAME(master-1), and latest has been pushed to Harbor, and a new tag and release are also generated in GitLab. The sample website will eventually be deployed to KubeSphere's
kubesphere-sample-devandkubesphere-sample-prodproject enviroenment as deployment and service.
| Environment | URL | Namespace | Deployment | Service |
|---|---|---|---|---|
| Dev | Public Network IP : 30861 (${EIP}:${NODEPORT}) |
kubesphere-sample-dev | ks-sample-dev | ks-sample-dev |
| Production | Public Network IP : 30961 (${EIP}:${NODEPORT}) |
kubesphere-sample-prod | ks-sample | ks-sample |
- You can go back to the project list through KubeSphere and view the status of the deployments and services in the two projects you created. For example, check the deployment under the
kubesphere-sample-prodproject below.
Enter the project, click Workload → Deployment on the menu bar on the left. You can see that ks-sample has been created successfully. Under normal circumstances, the status of the deployment should show in progress.
- Select Network and Service → Service **to **check according service. The service's revealed NodePort is
30961.
- Check the image pushed into your personal Harbor, you can see that devops-java-sample is the value of APP_NAME, and the tag is also the tag defined in Jenkinsfile-on-prem.
Visit the Sample Service
Access to services deployed to the KubeSphere Dev and Production environments in a browser or through background commands:
Dev Environment
For example, when browsers access to http://192.168.0.20:30861/ (namely, http://IP:NodePort/), you can visit the page of Hello,World! or through verification through background commands:
curl http://192.168.0.20:30861
Hello,World!
Prodcution Environment
Similarly, you can also access to http://192.168.0.20:30961/ (namely, http://IP:NodePort/).
At this point, in conjunction with GitLab and Harbor, creating a Jenkinsfile in SCM type pipeline in an offline environment is complete.