Installation
Intruction
Install on Linux
Install on Kubernetes
Related Tools
Cluster Operation
Quick Start
Cluster Admin Guide
Multi-tenant Management
Platform Management
Infrastructure
Monitoring Center
User Guide
Storage
Configuration Center
Project Settings
Development Guide
API Documentation
Installing HA Master and Etcd Cluster
Multi-node installation can help users successfully deploy a Multi-node cluster for development and testing. In a production environment, we have to consider the high availability of master and etcd nodes. The reason is that if the key components on the master node, for example kube-apiserver, kube-scheduler, and kube-controller-manager are single-node running, if the master is down then KubeSphere might be unavailable, it might be a big risk for online business.
Load Balancer can distribute traffic from multiple web services to multiple backend hosts, and can automatically detect and isolate unusable hosts,to improve service capability and availability of business. In addition, installing a HA cluster can be implemented with keepalved and Haproxy as well.
At least one etcd node needs to be deployed, but multiple etcd nodes (only support odd number) can make the cluster more reliable. This document walks you through how to create a highly available cluster by configuring the QingCloud Load Balancer.
Prerequisites
- Please make sure that you already read Multi-Node installation. This page only explains how to configure a HA cluster. As an optional configuration item, it will not elaborate on the procedures and parameters, see Multi-Node for details.
- Assume you already had a QingCloud Cloud Platform account.
Highly Available Architecture
This example prepares 6 hosts, master and etcd clusters will be deployed in 3 of them. It enables you to configure multiple master and etcd nodes in conf/hosts.ini.

Preparing a Load Balancer
This page shows an example of creating a load balancer on QingCloud platform, and briefly explain its creation steps. For details, please refer to QingCloud Document.
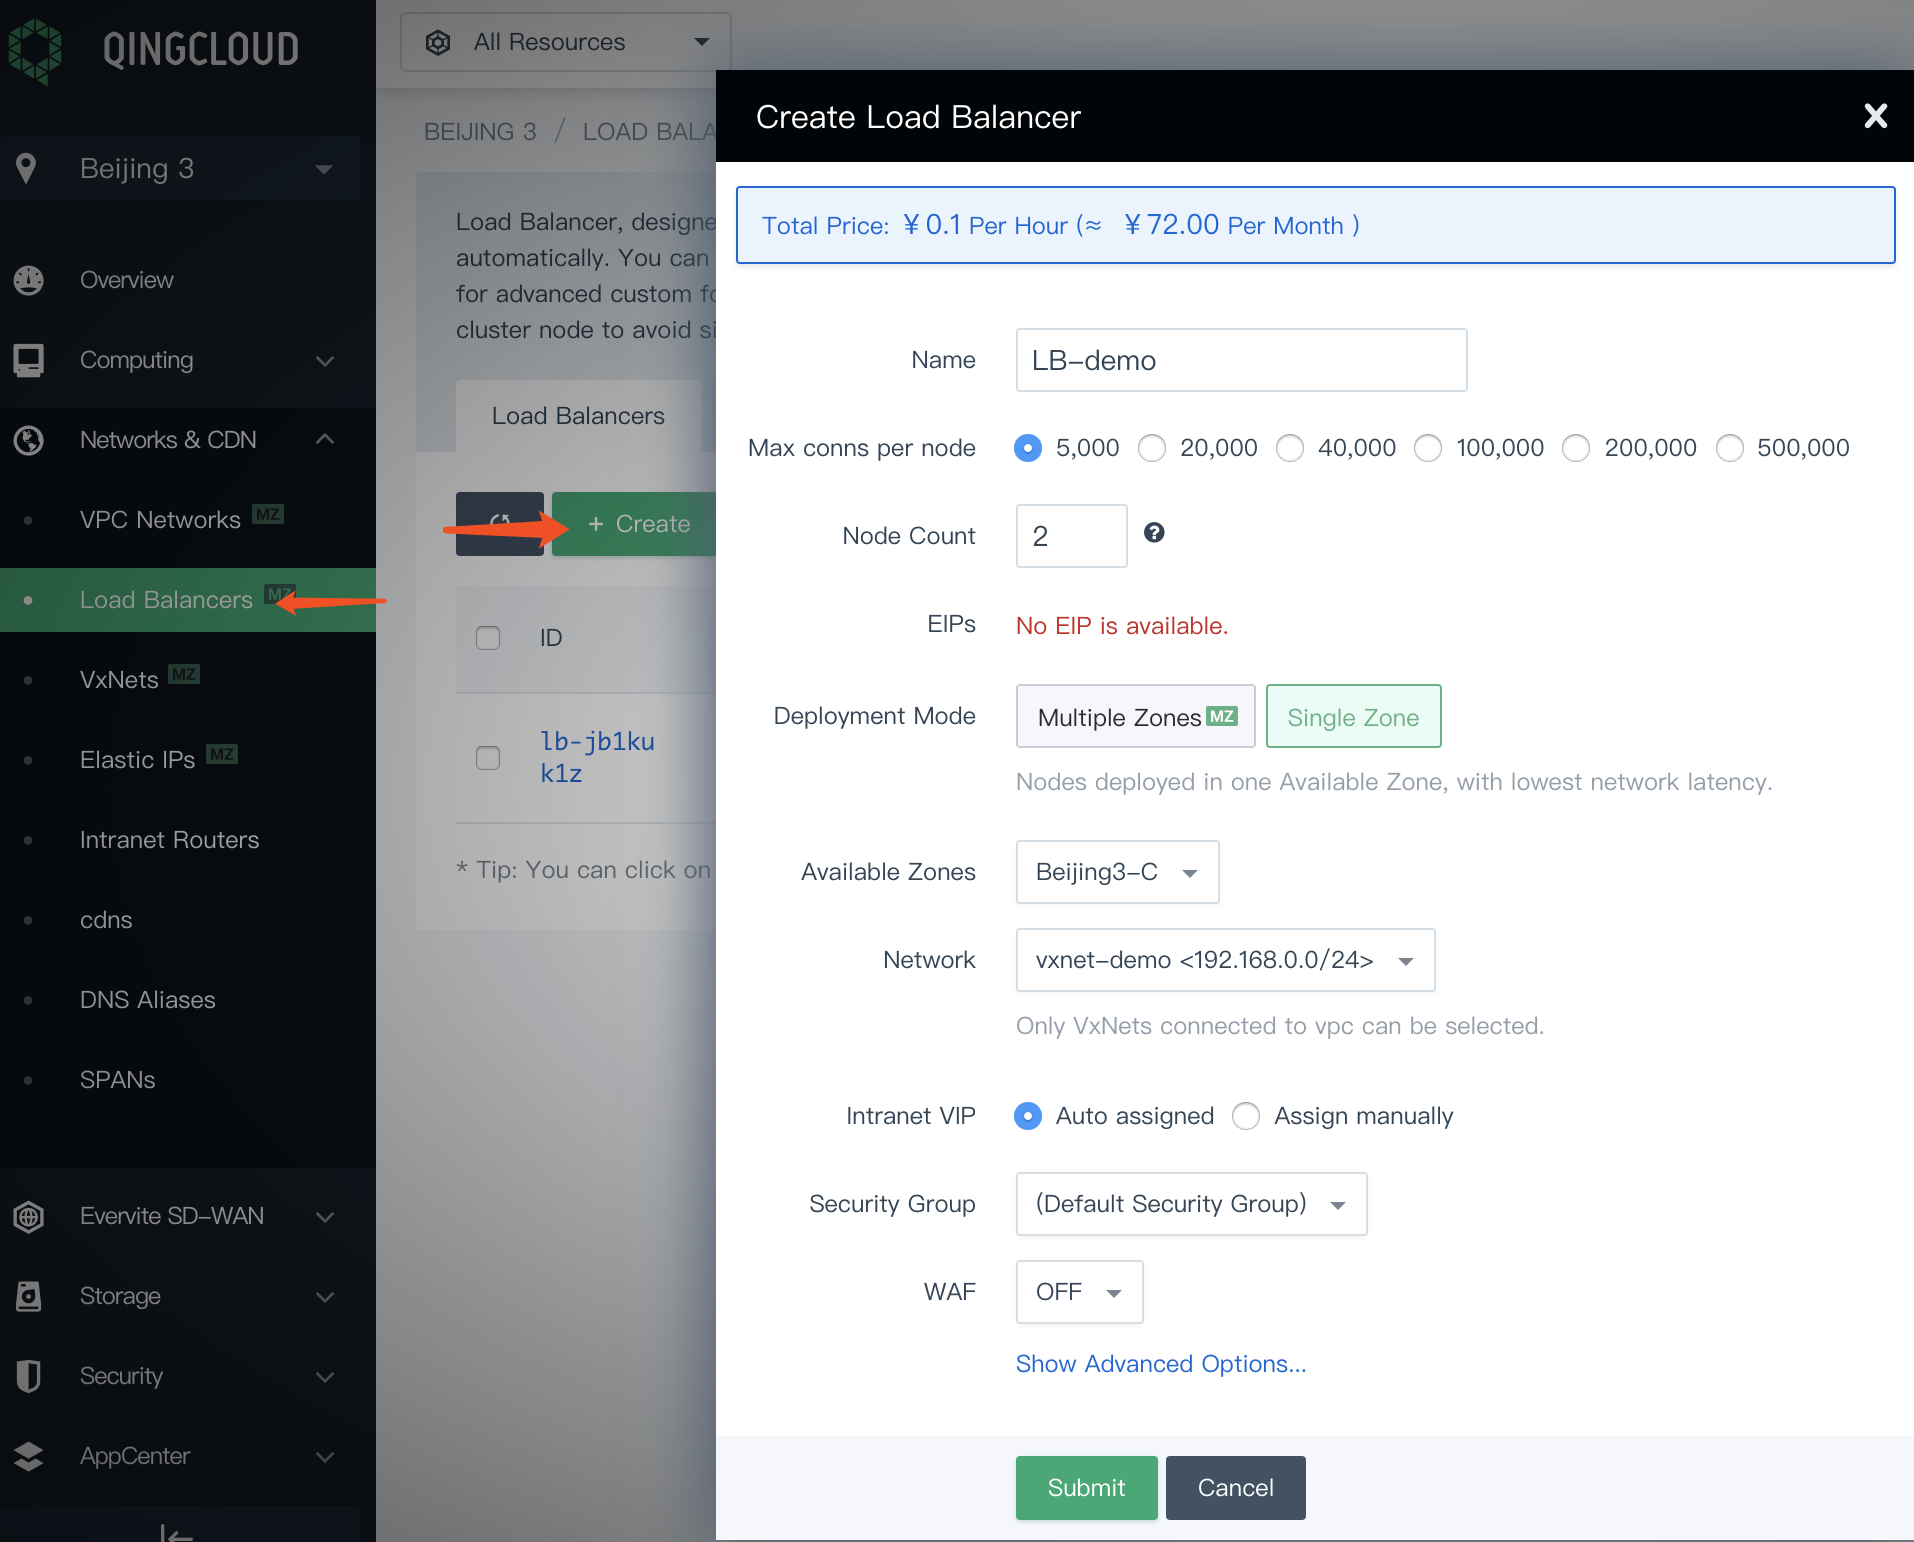
Step 1: Create a Load Balancer
Note: You need to apply for a VxNet at first, then you can create a Load Balancer in this VxNet.
Login QingCloud Cloud Platform and select Network & CDN → Load Balancers, then click the create button and fill in the basic information. The following example describes how to create a Load Balancer:
- Available Zones: For example, Beijing Zone 3 - C
- Deployment Mode: Single Zone
- Network: Select the private network of the VPC
Other settings can be kept as default. After filling in the basic information, click Submit to complete the creation.
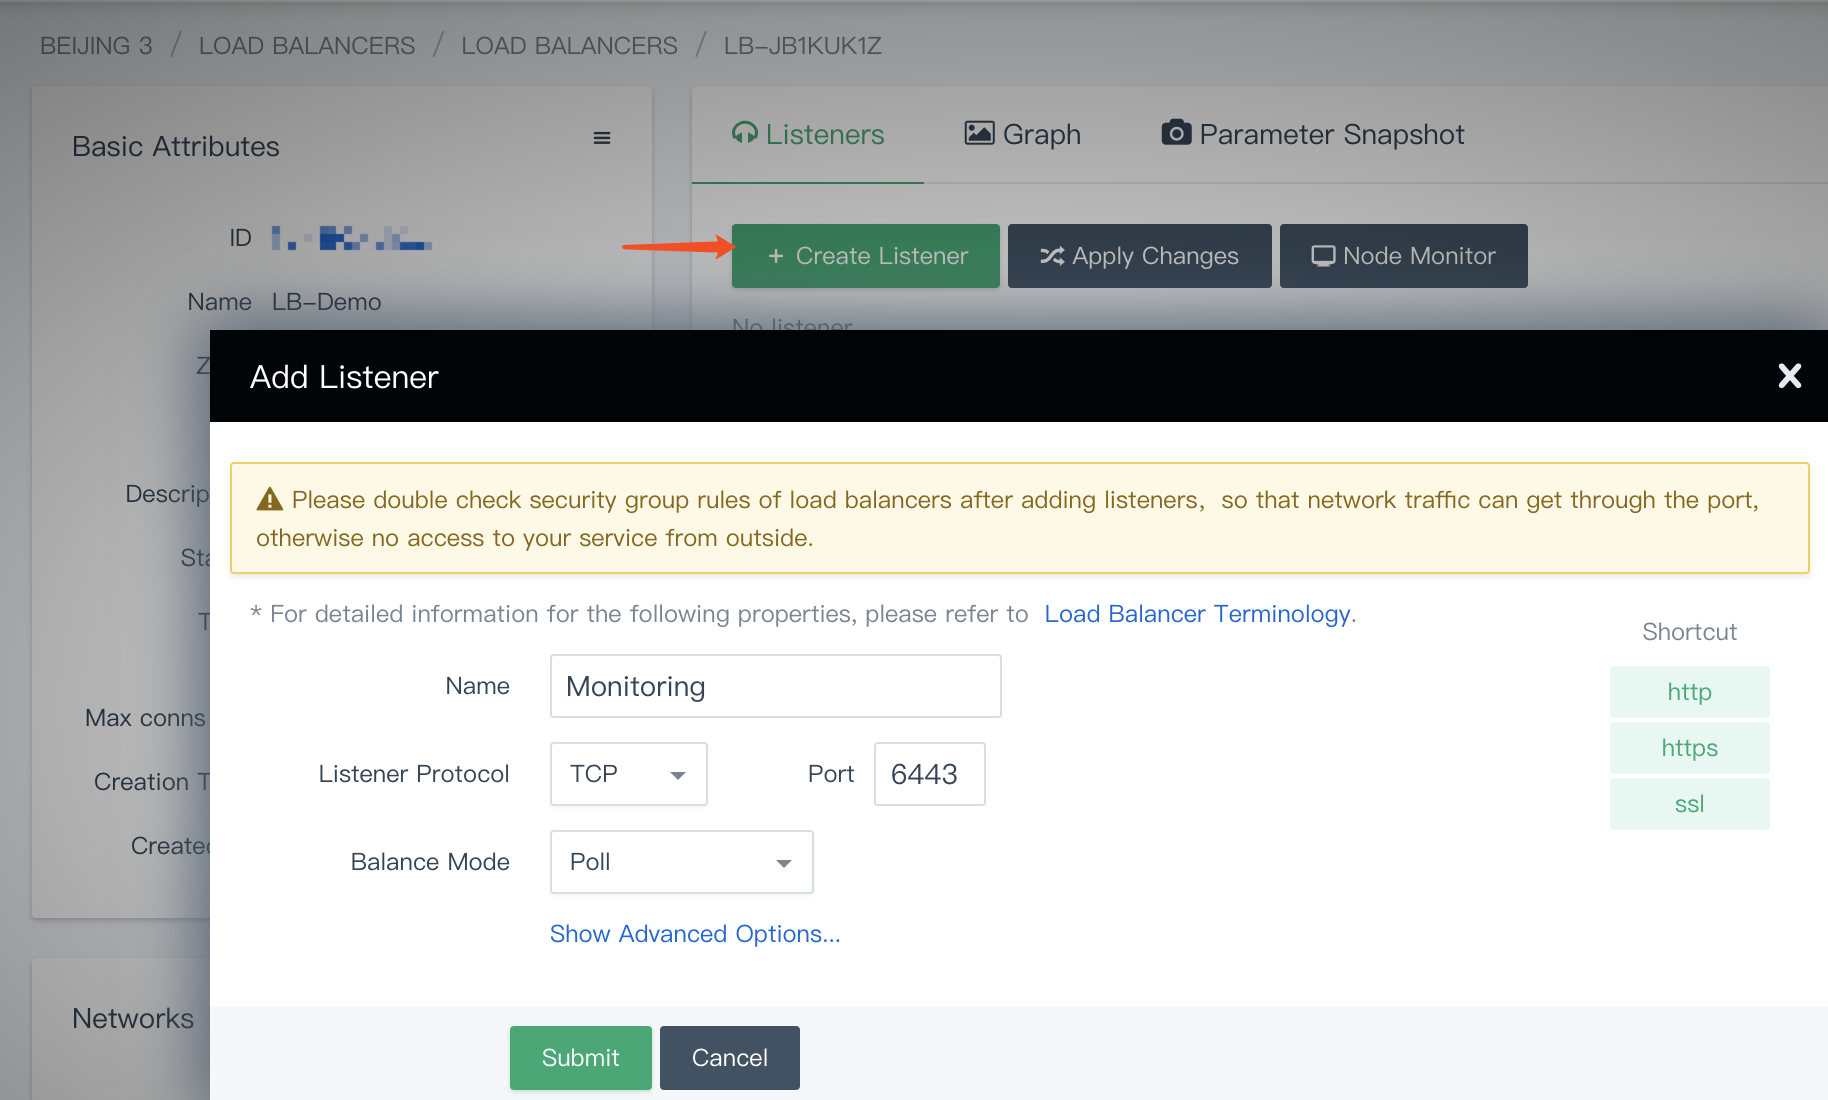
Step 2: Create the Listener
Enter into the Load Balancer that was created at last step, then create a Listener which is used to listen to port 6443 of the TCP protocol, any other ports could be listened as well. But the port in vars.yml should be consistent with the port which is set here, basic information should be filled in as follows.
- Name: Define a concise and clear name for this Listener
- Listener Protocol: Select TCP protocol
- Port: 6443
- Load mode: Poll
Note: After creating the listener, please check the firewall rules of the Load Balancer to ensure that the port
6443has been added to the firewall rules and the external network traffic can pass. Otherwise, the external network cannot access the service, and the installation may fail.
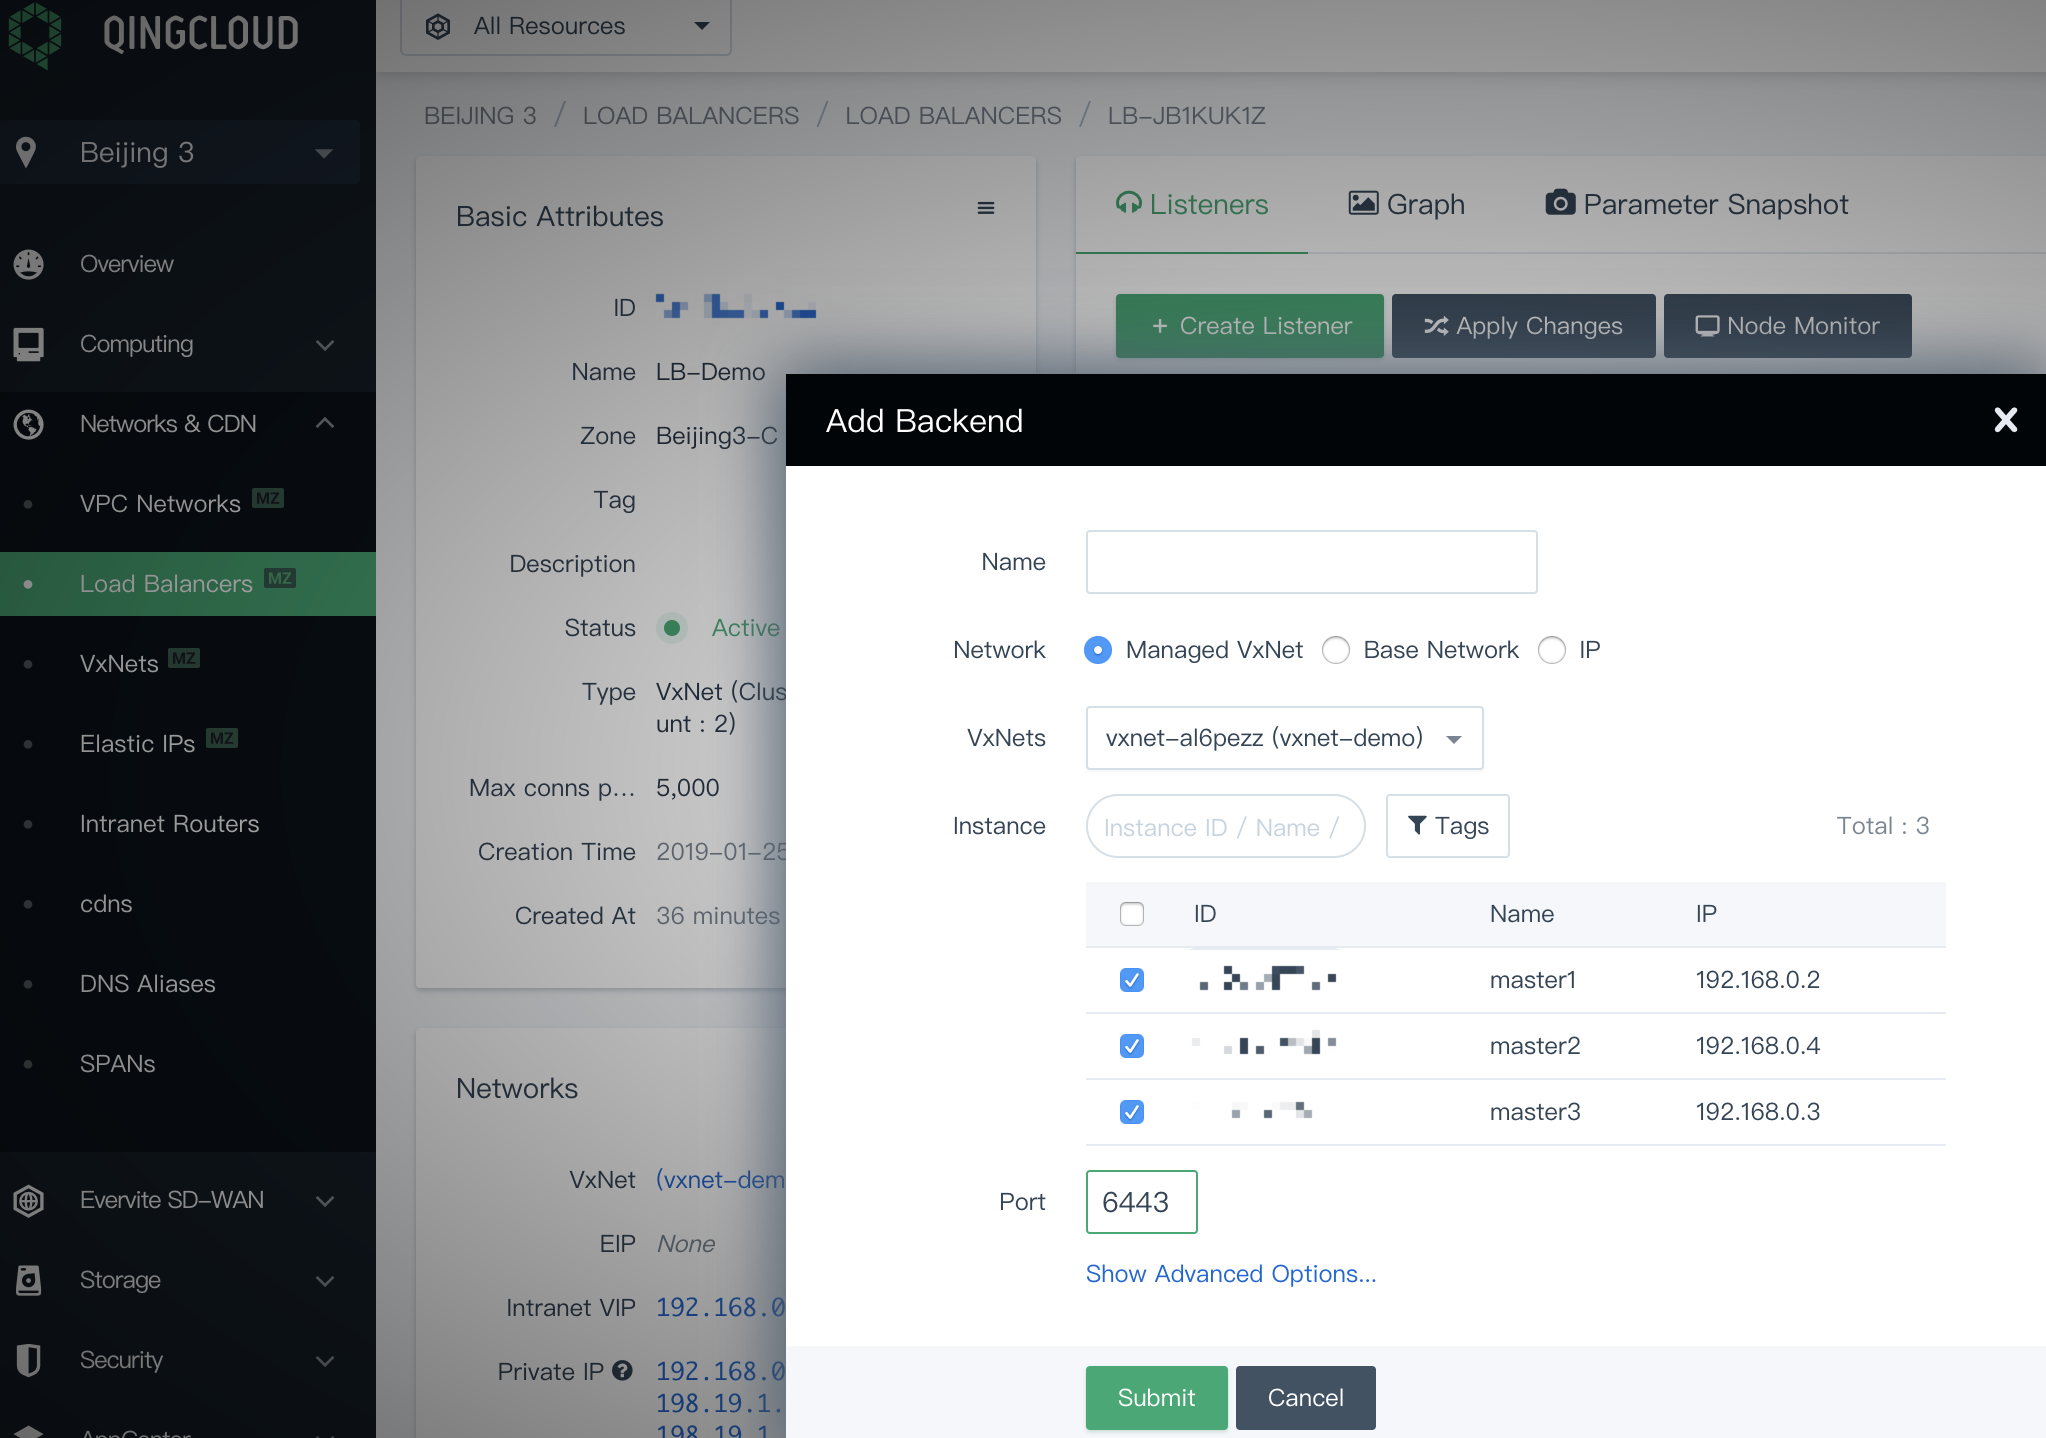
Step 3: Add the Backend Server
Note: Make sure that you have already prepared the corresponding servers before this step.
Under the current Load Balancer, click Add Backend
-
Select the
Managed VxNetnetwork and the VxNet where the cluster host is located (e.g. kubesphere), click Advanced Search, you can check multiple backend hosts in one time. For example, to achieve high availability of the Master node, you are supposed to check themaster1, master2, and master3as listed. -
Note that the port must be filled with
6443, which is the default port of the kube-apiserver. -
Finally, click Submit when you're done.
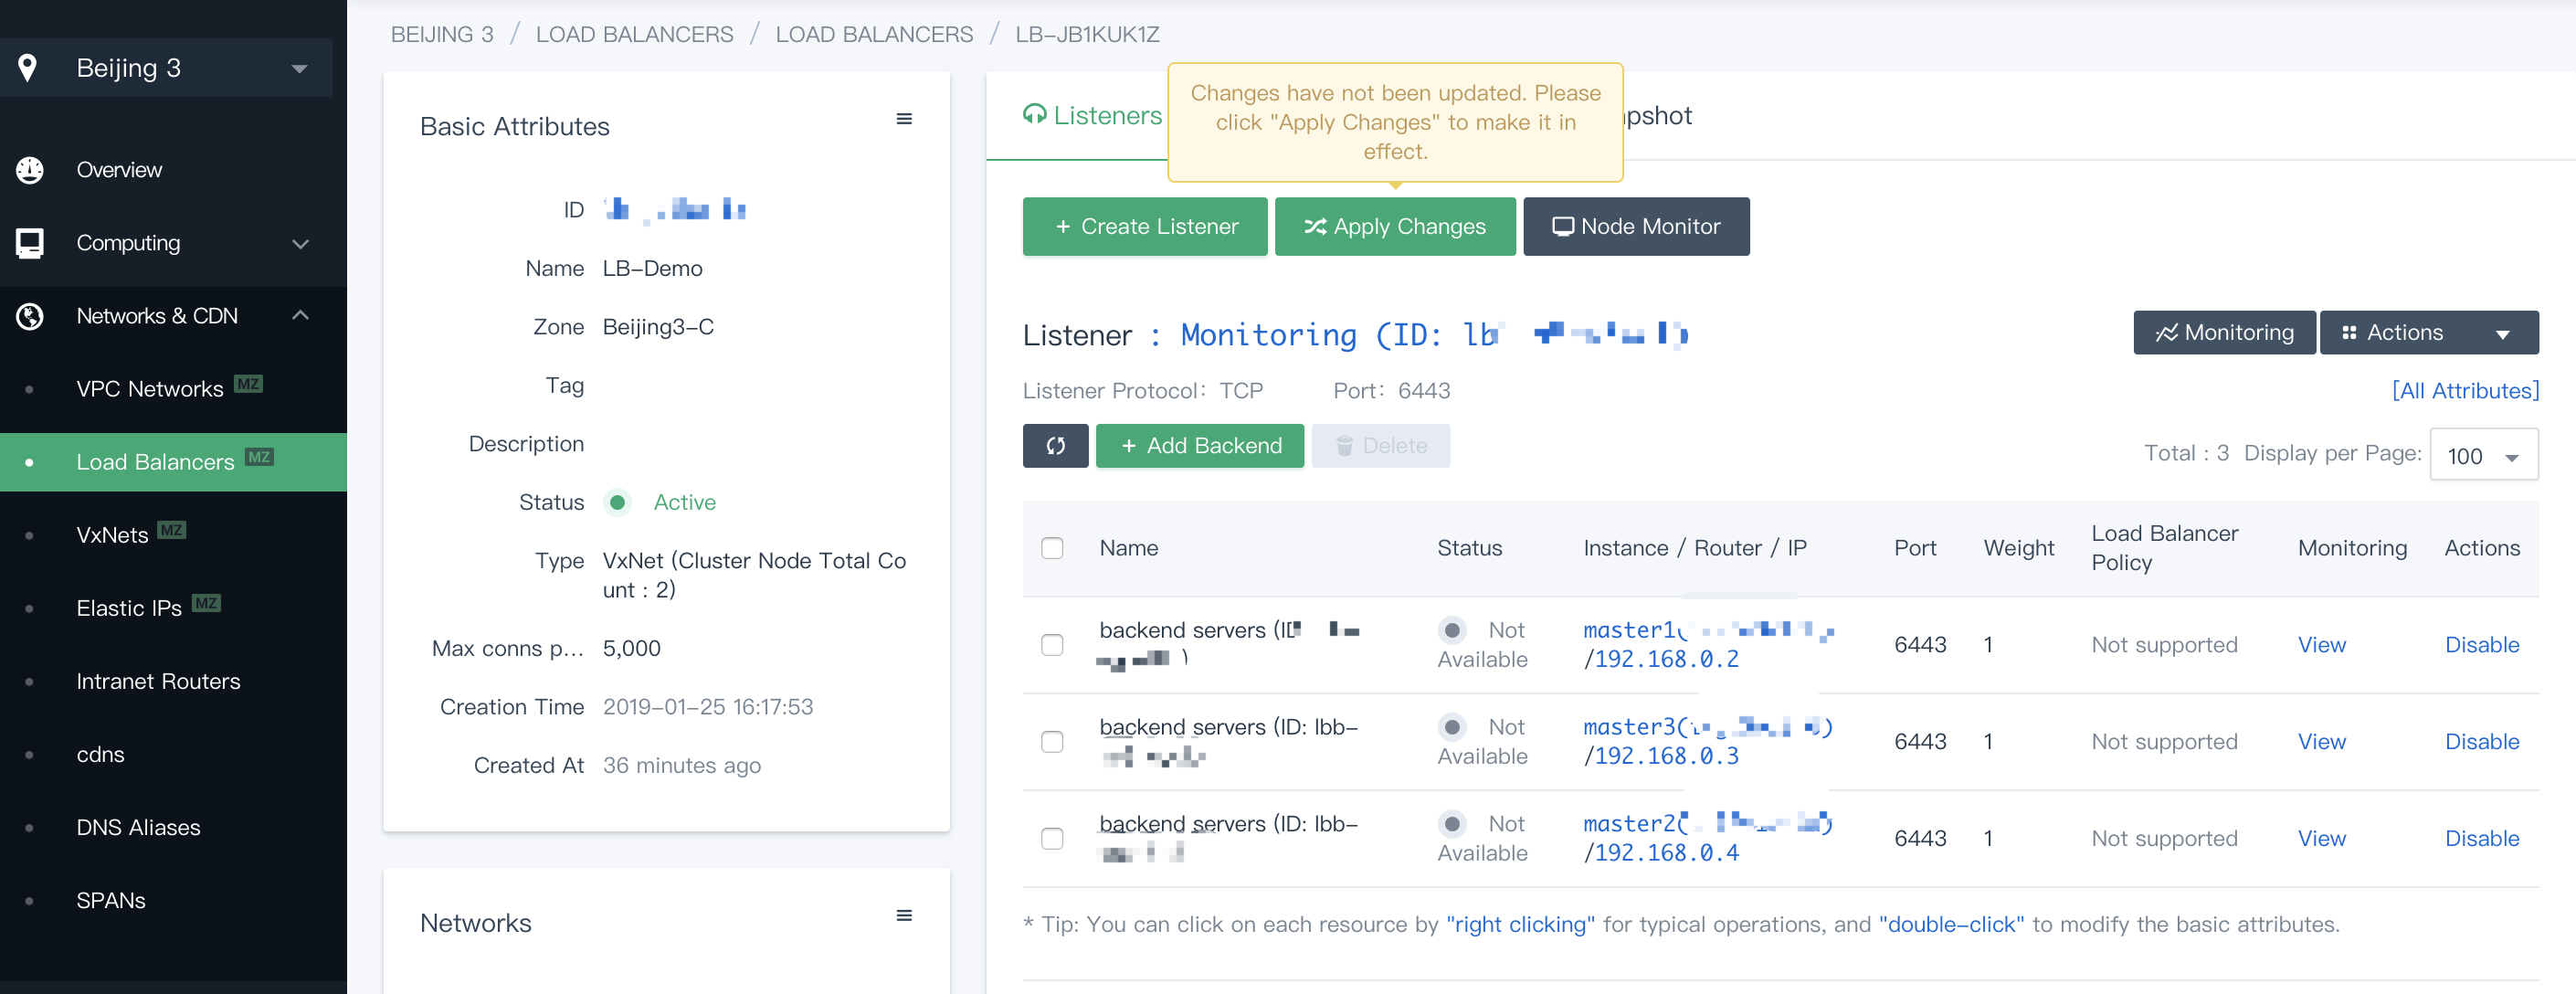
After adding the backend, you need to click Apply Changes to make it effective. You can verify the three added Master nodes of the current Load Balancer in the list.
Note that the state of the backend hosts showing "unavailable" in the listener, since the service port 6443 of api-server is not open, actually this is normal. After the installation is successful, the port 6443 of kube-apiserver on the backend hosts will be exposed, then the status will change to Active, indicating that the Load Balancer is working properly.
The host names master1, master2, and master3 can be filled in the [kube-master] and [etcd] sections of the following example as highly available Master and etcd nodes.
Note that the number of etcd needs to be set to odd number. Since the memory of etcd is relatively large, it may cause insufficient resources to the working node. Therefore, it is not recommended to deploy the etcd cluster on the working node.
In order to manage deployment process and target machines, please refer to the following example to configure all hosts in hosts.ini. It's recommneded to install using root user, here shows an example configuration in CentOS 7.5 using root user. Note that each host information occupies one line and cannot be wrapped manually.
Note:
- If installer is ran from non-root user account who has sudo privilege already, you need to reference the example section that is commented out in
conf/hosts.ini.- If the
rootuser cannot establish SSH connection with other machines in taskbox node, you need to refer to thenon-rootuser example inconf/hosts.inias well, but it's recommended to switch to therootuser when executinginstall.sh.
host.ini configuration example
[all]
master1  ansible_connection=local  ip=192.168.0.1
master2  ansible_host=192.168.0.2  ip=192.168.0.2  ansible_ssh_pass=PASSWORD
master3  ansible_host=192.168.0.3  ip=192.168.0.3  ansible_ssh_pass=PASSWORD
node1  ansible_host=192.168.0.4  ip=192.168.0.4  ansible_ssh_pass=PASSWORD
node2  ansible_host=192.168.0.5  ip=192.168.0.5  ansible_ssh_pass=PASSWORD
node3  ansible_host=192.168.0.6  ip=192.168.0.6  ansible_ssh_pass=PASSWORD

[kube-master]
master1
master2
master3

[kube-node]
node1
node2
node3

[etcd]
master1
master2
master3

[k8s-cluster:children]
kube-node
kube-master
Configure the LB Parameters
Finally, you need to modify the relevant parameters in the vars.yaml after prepare the Load Balancer. Assume the internal IP address of the Load Balancer is 192.168.0.10 (replaced it with your actual Load Balancer IP address), and the listening port of the TCP protocol is 6443, then the parameter configuration in conf/vars.yml can be modified like the following example (loadbalancer_apiserver as an optional configuration which should be uncommented in the configuration file).
- Note that address and port should be indented by two spaces in the configuration file.
- The domain name of the Load Balancer is "lb.kubesphere.local" by default for internal access. If you need to modify the domain name, please uncomment and modify it.
vars.yml configuration sample
## External LB example config
## apiserver_loadbalancer_domain_name: "lb.kubesphere.local"
loadbalancer_apiserver:
  address: 192.168.0.10
  port: 6443
See Multi-Node to configure the related parameters of the persistent storage in vars.yml and complete the rest multi-node installation process after completing highly available configuration.