Installation
Intruction
Install on Linux
Install on Kubernetes
Related Tools
Cluster Operation
Quick Start
Cluster Admin Guide
Multi-tenant Management
Platform Management
Infrastructure
Monitoring Center
User Guide
Storage
Configuration Center
Project Settings
Development Guide
API Documentation
a CI/CD Pipeline based on Spring Boot Project
Jenkinsfile in SCM serves to add the file of Jenkinsfile as a part of the Source Control Management. According to the CI/CD function module in the file's pipeline configuration, such as Stage, Step and Job, the Jenkinsfile should be included in the code registries.
Objective
The tutorial below will show you how to create a pipeline through the Jenkinsfile in the GitHub registry. There are 8 stages in the pipeline. After the pipeline creation, the page of Hello World will be deployed in the Dev and Production of KubeSphere cluster. The page can be accessed through the public network.
Hand-on Lab
Pipeline Overview
The flow chart below illustrates the pipeline's complete work process:

Note:
- Stage I. Checkout SCM: Extract codes from the GitHub registry.
- Stage II. Unit test: It's a must to pass the unit test for the following jobs.
- Stage III. sonarQube analysis:Process sonarQube code quality test.
- Stage IV. Build & push snapshot image: Build the image based on selected branches in the behaviour strategy. Push the tag of
SNAPSHOT-$BRANCH_NAME-$BUILD_NUMBERto Harbor, among which, the$BUILD_NUMBERis the operation serial number in the pipeline's activity list.- Stage V. Push latest image: Tag the master branch as latest and push it to DockerHub.
- Stage VI. Deploy to dev: Deploy master branch to Dev environment. Verification is needed for this stage.
- Stage VII. Push with tag: Generate tag and released to GitHub. Then push the tag to DockerHub.
- Stage VIII. Deploy to production: Deploy the released tag to the Production environment.
Create Credentials
The project-regular users have been granted the role of maintainer in the Quick Start Guide of Multi-tenant Management. Thus, you can login KubeSphere as project-regular, enter into the created devops-demo project and start to create credentials.
-
The Jenkinsfile in the code registry of this tutorial will need three credentials ranging from DockerHub, GitHub to **kubeconfig **(kubeconfig is used to access to the running Kubernetes cluster). Refer to Create Credentials to create the three credentials.
-
Then refer to Visit SonarQube for Token Creation to create a Token of Java and copy the Token.
-
Finally, in the DevOps project, click Create Credentials similar steps as above. Create a credential for
Secret Textand name it as sonar-token. **Secret is the copied token. Click **Confirm after completion.

For now, the 4 credentials have been created. In the next step, you need to change the 4 credential IDs into customized credential IDs in the jenkinsfile of the tutorial registry.

Edit Jenkinsfile
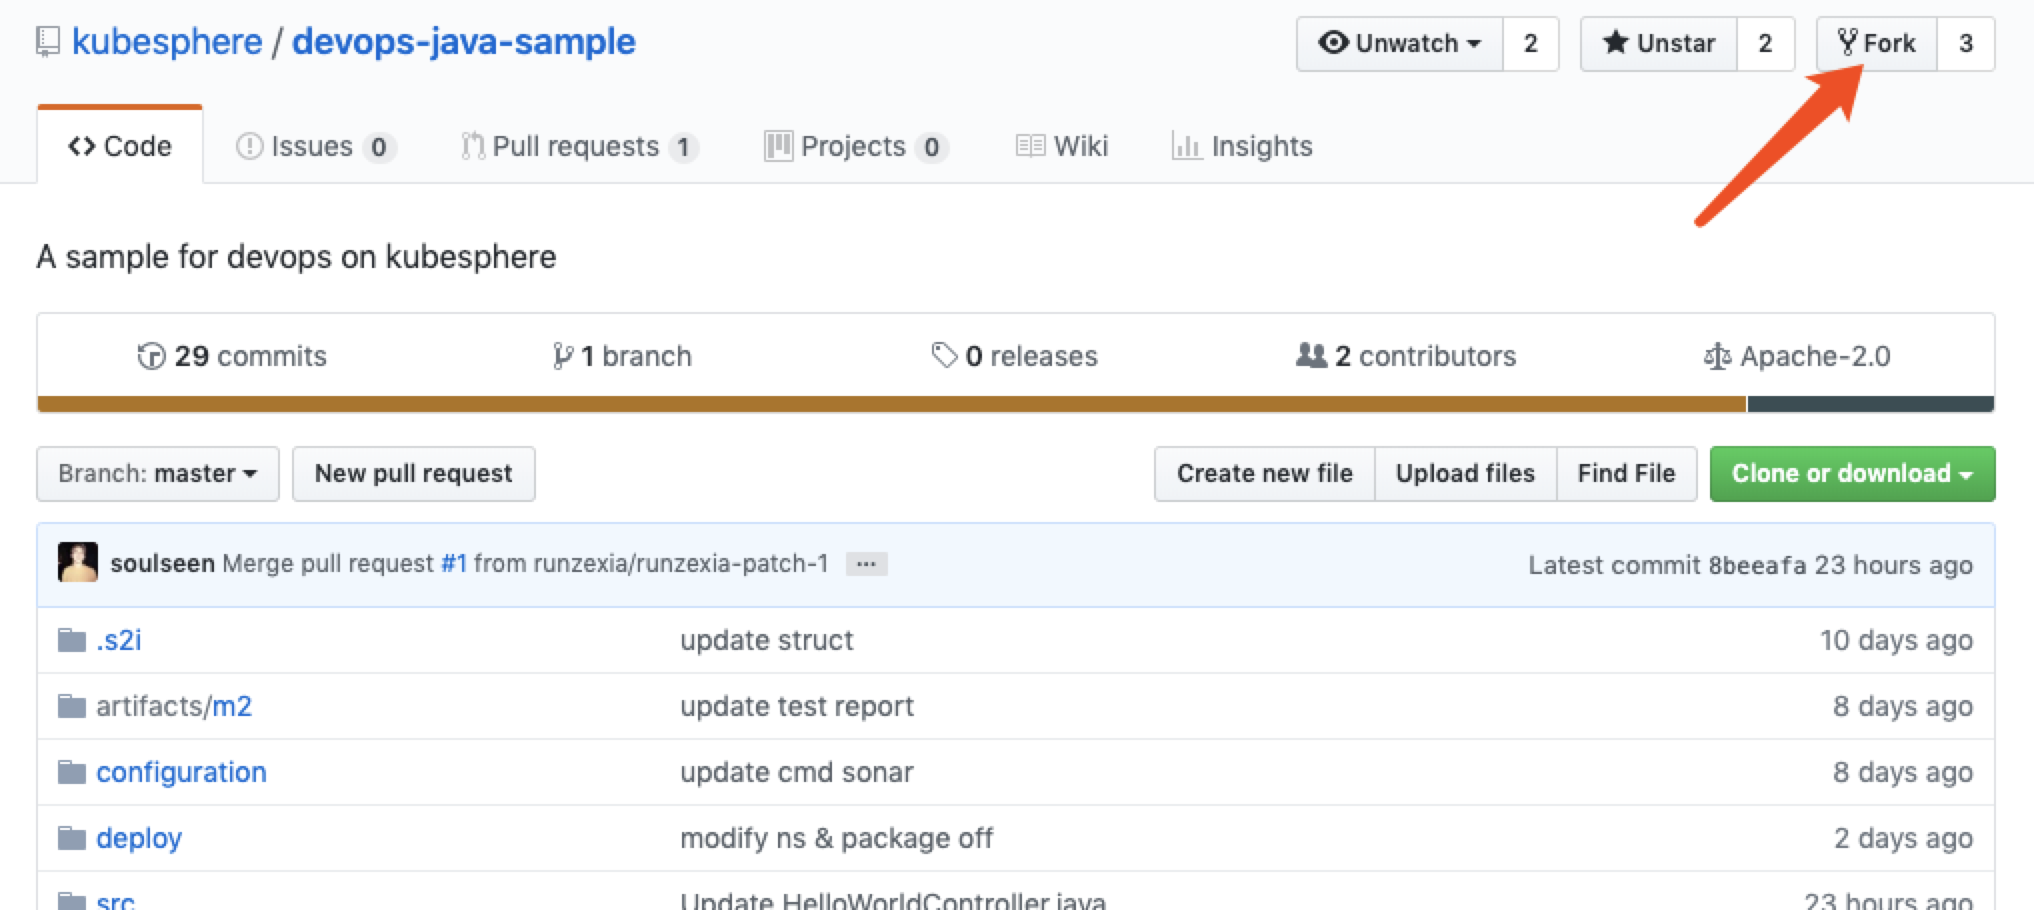
Step1: Fork Project
Login GitHub. Fork the devops-java-sample from GitHub repository to your own GitHub.
Step 2: Edit Jenkinsfile
- After forking to your own GitHub. Enter into the Jenkinsfile-online from the Root Directory.

- Click the editing logo in GitHub UI to edit the values of environment variables.
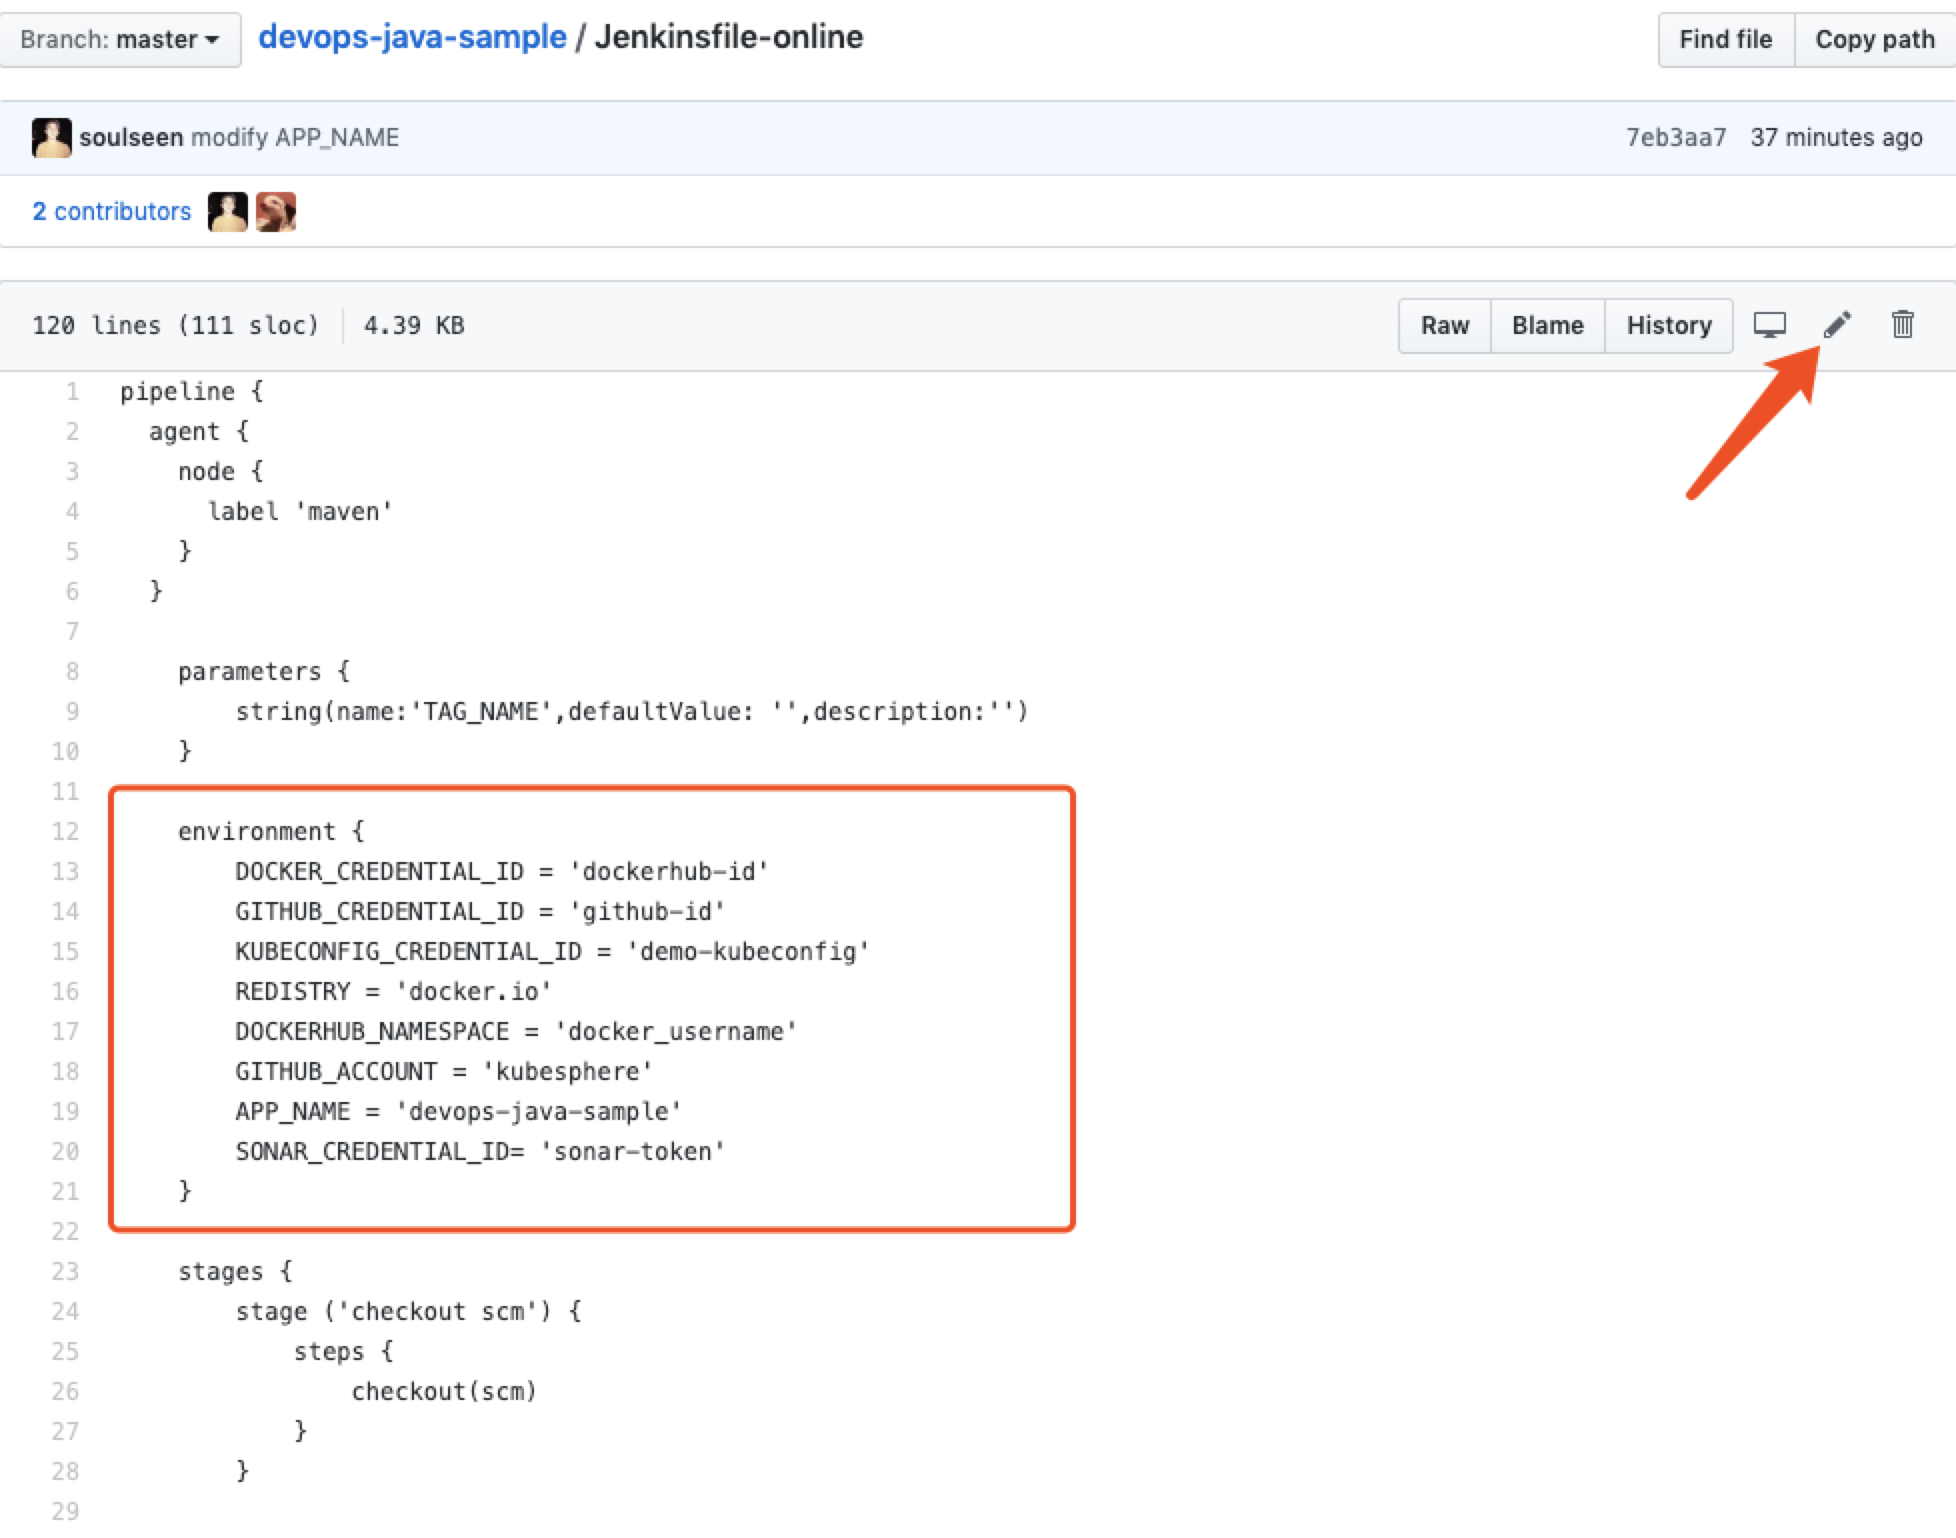
| Editing Items | Value | Description |
|---|---|---|
| DOCKERCREDENTIALID | dockerhub-id | Fill in DockerHub's credential ID to log in your DockerHub. |
| GITHUBCREDENTIALID | github-id | Fill in the GitHub credential ID to push the tag to GitHub repository. |
| KUBECONFIGCREDENTIALID | demo-kubeconfig | kubeconfig credential ID is used to access to the running Kubernetes cluster. |
| REGISTRY | docker.io | Set the web name of docker.io by default for pushing images. |
| DOCKERHUB_NAMESPACE | your-dockerhub-account | Replace it to your DockerHub's account name. (It can be the Organization name under the account.) |
| GITHUB_ACCOUNT | your-github-account | Change your GitHub account name, such as https://github.com/kubesphere/. Fill in kubesphere which can also be the account's Organization name. |
| APP_NAME | devops-java-sample | Application name |
| SONARCREDENTIALID | sonar-token | Fill in the SonarQube token credential ID for code quality test. |
Note: The command parameter -o of Jenkinsfile's mvn indicates that the offline mode is on. This tutorial has downloaded relevant dependencies to save time and to adapt to network interference in certain environments. The offline mode is on by default.
- After editing the environmental variables, click **Commit changes **and submit the updates to the master branch.

Project Creation
CI/CD pipeline is based on the yaml template document in the tutorial project. Under the Namespace environment, CI/CD pipeline will deploy the tutorial to the two projects of Dev and Production which are kubesphere-sample-dev and kubesphere-sample-prod. These two projects need to be created in order on the console in advance. Refer to the following steps to create the project.
Step 1: Create The First Project
Tip:The account of
project-adminhas been created in the Quick Start Guide of Multi-tenant Management.
-
Use the account of
project-adminto log in KubeSphere. Under the created demo-workspace, click Project → Create. **Create a resource project as this tutorial's development environment. Fill in this project's basic information. Click **Next after completion. -
Name: Fix the name as
kubesphere-sample-dev. If you need to change the project name, you can edit namespace in the yaml Template File. -
Nickname: It can be customized as development environment.
-
Description: Simply introduce the project for users.
-
This tutorial has no resource request or limitations. Thus, advanced configurations do not need to edit fault values. Click Create to complete the project.
Step 2: Invite Members
After the first project, the project-admin still needs to invite project-regular users to the project of kubesphere-sample-dev. Find 「Project Setting」→「Project Member」. Click「Invite Members」to invite project-regular and grant then the role of operator. For further details, please refer to
Quick Start Guide of Multi-tenant Management-Inviting Members.
Step 3: Create the Second Project
Similarly, create a project named kubesphere-sample-prod following the two steps above. This project is the production environment. Then invite project-regular to the project of kubesphere-sample-prod, and grant it the role of operator.
Note: When the CI/CD pipeline succeeded. You will see the pipeline's Deployment and Service from the projects of
kubesphere-sample-devandkubesphere-sample-prod.

Pipeline Creation
Step 1: Fill in Basic Information
- Enter into the created DevOps project. Select Pipeline and lick Create.

-
Fill in the pipeline's basic information in the pop-up window.
-
Name: Create a simple name for the pipeline.
-
Description: Simply introduce the pipeline's main features for users to know further about the pipeline's functions.
-
Code repository: Choose code repository in which, Jenkinsfile is needed.

Step 2: Add Repository
-
Click create code repository. Take the GitHub repository for an example.
-
Click Gain Token.

- Fill in Token description in the GitHub's access token page. Simply describe the token, such as DevOps demo. No need to change the Select scopes. Click
Generate token, GitHub will generate a mix of letters and numbers as token to access to the GitHub repo of the current account.

-
Copy the created token. Fill in the token to the KubeSphere Token frame and click save.
-
After passing the verification, all the code repositories relating to this Token will be listed on the right. Among them, select a repository with Jenkinsfile. For example, after you choose the sample repository of devops-java-sample click Select and then click Next.

Step 3: Advance Settings
After completing the repositories' configurations, enter into the advanced setting page. Advanced settings support customization of the pipeline's creation records, action strategy, behaviour strategy and regular scanning. The following is simple descriptions about the relevant configurations.
- When building settings, check
Discard old settings. Set the** branch preserving days** and the maximum branch number to -1 by default.

Note: The branches can be controlled by both of the preservation days and the branch number. If the branch has expired the preservation dates or exceeded the limitation number, the branch should be discarded. For example, if the preservation day is 2 and the branch number is 3, any branches that do not meet the requirements should be discarded. Set both of the limitation to -1 by default means it will permanently clear the branch that has been deleted.
Discarding old branches means that you will discard the branch record all together. The branch record includes console output, archive artifacts and other relevant data. Keeping less branches saves Jenkins' disk space. We provide two options to determine when to discard old branches:
- Days for preserving the branches: If branch reaches the days, it must be discarded.
- Number of branches: If there is a significant number of branches, the oldest branches should be discarded.
- In the behaviour strategy, KubeSphere adds three strategies by default. Since this example has not applied the strategy of Finding PR from Fork repository, this strategy can be deleted.

Note: There types of discovering strategies are supported. When the Jenkins pipeline is activated, the Pull Request (PR) submitted by the developer will also be regarded as a separate branch. Discover the branch:
- Exclude the branch as PR: Select this option means that CI will not scan the source branch as such Origin's master branch. These branches needs to be merged.
- Only the branched submitted as PR: Only scan the PR branch.
- All the branches: extract all the branches from the repository origin.
Discover PR from the origin repository:
- The source code after PR merges with the branch: Once discovery operation is based on the source codes derived from merging the PR and the target branch. It is also based on the running pipeline.
- PR's source code edition: Once discovery operation is based on the pipeline build by PR's source codes.
- There will be two pipelines when the PR is found. One pipeline applies PR's source code and the other one uses the source code from merging the PR with the target branch: This is twice discovery operation.
- The script path **is **Jenkinsfile by default. Please change it to Jenkinsfile-online。
Note: Script path is the Jenkinsfile path in the code repository. It indicates the repository's root directory. If the file location changes, the script path should also be changed.

- When scanning** Repo Trigger** check
If there is no automatic scanning, scan regularly. The scanning time can be customized according to the team preference. The example here set it as5 minutes.
Note: Regular scaning is to set a cycle to require the pipeline scan remote repositories regularly. According to the **Behaviour Strategy **to check whether there is a code update or a new PR.
Webhook Push: Webhook is a high-efficiency way to detect the changes in the remote repository and automatically activate new operations. Webhook should play the main role in scanning Jenkins for GitHub and Git (like Gitlab). Please refer to the cycle time setting in the previous step. In this sample, you can run the pipeline manually. If you need to set automatic scanning for remote branches and active the operation, please refer to Setting automatic scanning - GitHub SCM.
Complete advanced settings and click Create.

Step 4: Operate the Pipeline
After building the pipeline, click Refresh in the browser. You can find a running record after automatically creating the remote branch.
-
Click Run on the right. According to the Behaviour Strategy, scan branches from the code repository automatically. Then build the pipeline's
masterbranch in the pop-up window. The system will upload Jenkinsfile-online according to the input branch (The default option is the Jenkinsfile). -
Since there is no default option for
TAG_NAME: defaultValuein Jenkinsfile-online, put in a tag number in theTAG_NAMEsuch as v0.0.1. -
Click **Confirm **to activate a new pipeline.
Note: Tag is used to generate release and images with tags. Besides, when the main pipeline is released,
TAG_NAMEshould not duplicate the existingtagnames in the code repository. If the repetition occurs the pipeline cannot run.

For now, the pipeline has been accomplished and starts running.
Note: Click Branch to change the branch list and review which branches run the pipeline. The branch here is determined by the Behaviour Strategy.

Step 5: Check the pipeline
The sample account is used to check the pipeline. When the pipeline runs to the step of input
it will pause. You need to click Continue manually. Please note that there are three stages in the Jenkinsfile-online which are used to deploy Dev and Production environments as well as push tags. Therefore, the pipeline will be reviewed three times in the three stages of deploy to dev, push with tag, deploy to production. If you do not want to check the pipeline, just click Stop.

Note: In real development production scenario, admins and operators with higher authority are needed to review the pipeline and the image. They should decide whether to push the pipeline and image to the code repositories or the image registries and whether to push them from deployment to development or production environment. In Jenkinsfile, the
inputstep supports specified users to review the pipeline. If you want to specify a user named project-admin to review, you can add some words in the Jenkinsfile's input function. If there are multiple users, you need to use commas to separate them as follows:
···
input(id: 'release-image-with-tag', message: 'release image with tag?', submitter: 'project-admin,project-admin1')
···
Check the Pipeline
- Click the running pipeline's serial numbers. The page demonstrates the operating status of every activity step. Please note that the pipeline is in the initializing phase when the creation just completed. Thus, only the log window can be seen. After about one minute, you can see the pipeline. The black boxes have tagged the pipelines step names. There are 8 stages in the sample pipeline and they have been defined individually in Jenkinsfile-online.

- Check the pipeline's running log by clicking
Check the logat the top right corner. The page exhibits specific log, operating status and time etc. for every step. Click specific stage on the left to unfold the log. The log can be downloaded to local for location analysis.

Verify Results
- Once you successfully excuted the pipeline, click the pipeline's
code qualityto check the code quality check results through sonarQube as the follows (reference only).

- The Docker image built by the pipeline has been successfully pushed to DockerHub. We have set the DockerHub in Jenkinsfile-online. The pushed images can be checked by logging in DockerHub. It can be seen that the tag's images of snapshot, TAG_NAME(master-1) and latest have been pushed to DockerHub. And a new tag and a new release have been generated in GitHub. The sample page of Hello World will be deployed to
kubesphere-sample-devandkubesphere-sample-prodas deployment and service.
| Environment | URL | Namespace | Deployment | Service |
|---|---|---|---|---|
| Dev | http://{$Virtual IP}:{$8080} |
|||
or http://{$internal website/public website IP}:{$30861} |
kubesphere-sample-dev | ks-sample-dev | ks-sample-dev | |
| Production | http://{$Virtual IP}:{$8080} |
|||
or http://{$internal website/public website IP}:{$30961} |
kubesphere-sample-prod | ks-sample | ks-sample |
- Back to the project list through KubeSphere. Check the deployment and service status of the two created projects. For example, you can check the deployment of the project of
kubesphere-sample-prod.
Enter into the project. From Workload → Deployment, you can find a successfully built ks-sample. Under the normal circumstances, the deployment status is Operating.

- Select Web and Service → Service **to check the created service and the Virtual IP
10.233.42.3. The exposed NodePort is **30961.
Check the service

- Check the image pushed to your DockerHub. The
devops-java-sampleis the value of APP_NAME. And the tag is defined in jenkinsfile-online.

- Click
release,to check thev0.0.1tag and the release from your own GitHub repo. Both the tag and the release are generated bypush with tagin jenkinsfile.
Visit The Sample Service
If the HelloWorld service is deployed in the internal networks, it can be accessed through SSH login cluster nodes; it is also accessible by applying admin accounts to log in KubeSphere. You only need to put in the following command in the web kubectl, in which the Virtual IP and NodePort can be checked through the according project services:
**Check the sample service under the Dev Environment. **
# curl {$Virtual IP}:{$Port} 或者 curl {$内网 IP}:{$NodePort}
curl 10.233.40.5:8080
Hello,World!
Virtual IP 在
**Check the sample service under the Production environment. **
# curl {$Virtual IP}:{$Port} 或者 curl {$内网 IP}:{$NodePort}
curl 10.233.42.3:8080
Hello,World!
If the two services can be accessed, the pipeline operation can be a success.
For now, the pipeline based on the Jenkinsfile in SCM of GitHub and DockerHub has been completed. If you have questions during the creation, please refer to Frequent Q&A.