Installation
Intruction
Install on Linux
Install on Kubernetes
Related Tools
Cluster Operation
Quick Start
Cluster Admin Guide
Multi-tenant Management
Platform Management
Infrastructure
Monitoring Center
User Guide
Storage
Configuration Center
Project Settings
Development Guide
API Documentation
CronJobs
A Cron Job creates Jobs on a time-based schedule. One CronJob object is like one line of a crontab (cron table) file. It runs a job periodically on a given schedule. The schedule of CronJob can be set, for example, */1 * * * * means excute the job every 1 minute, the format of the timing plan please reference CRON.
Create a CronJob
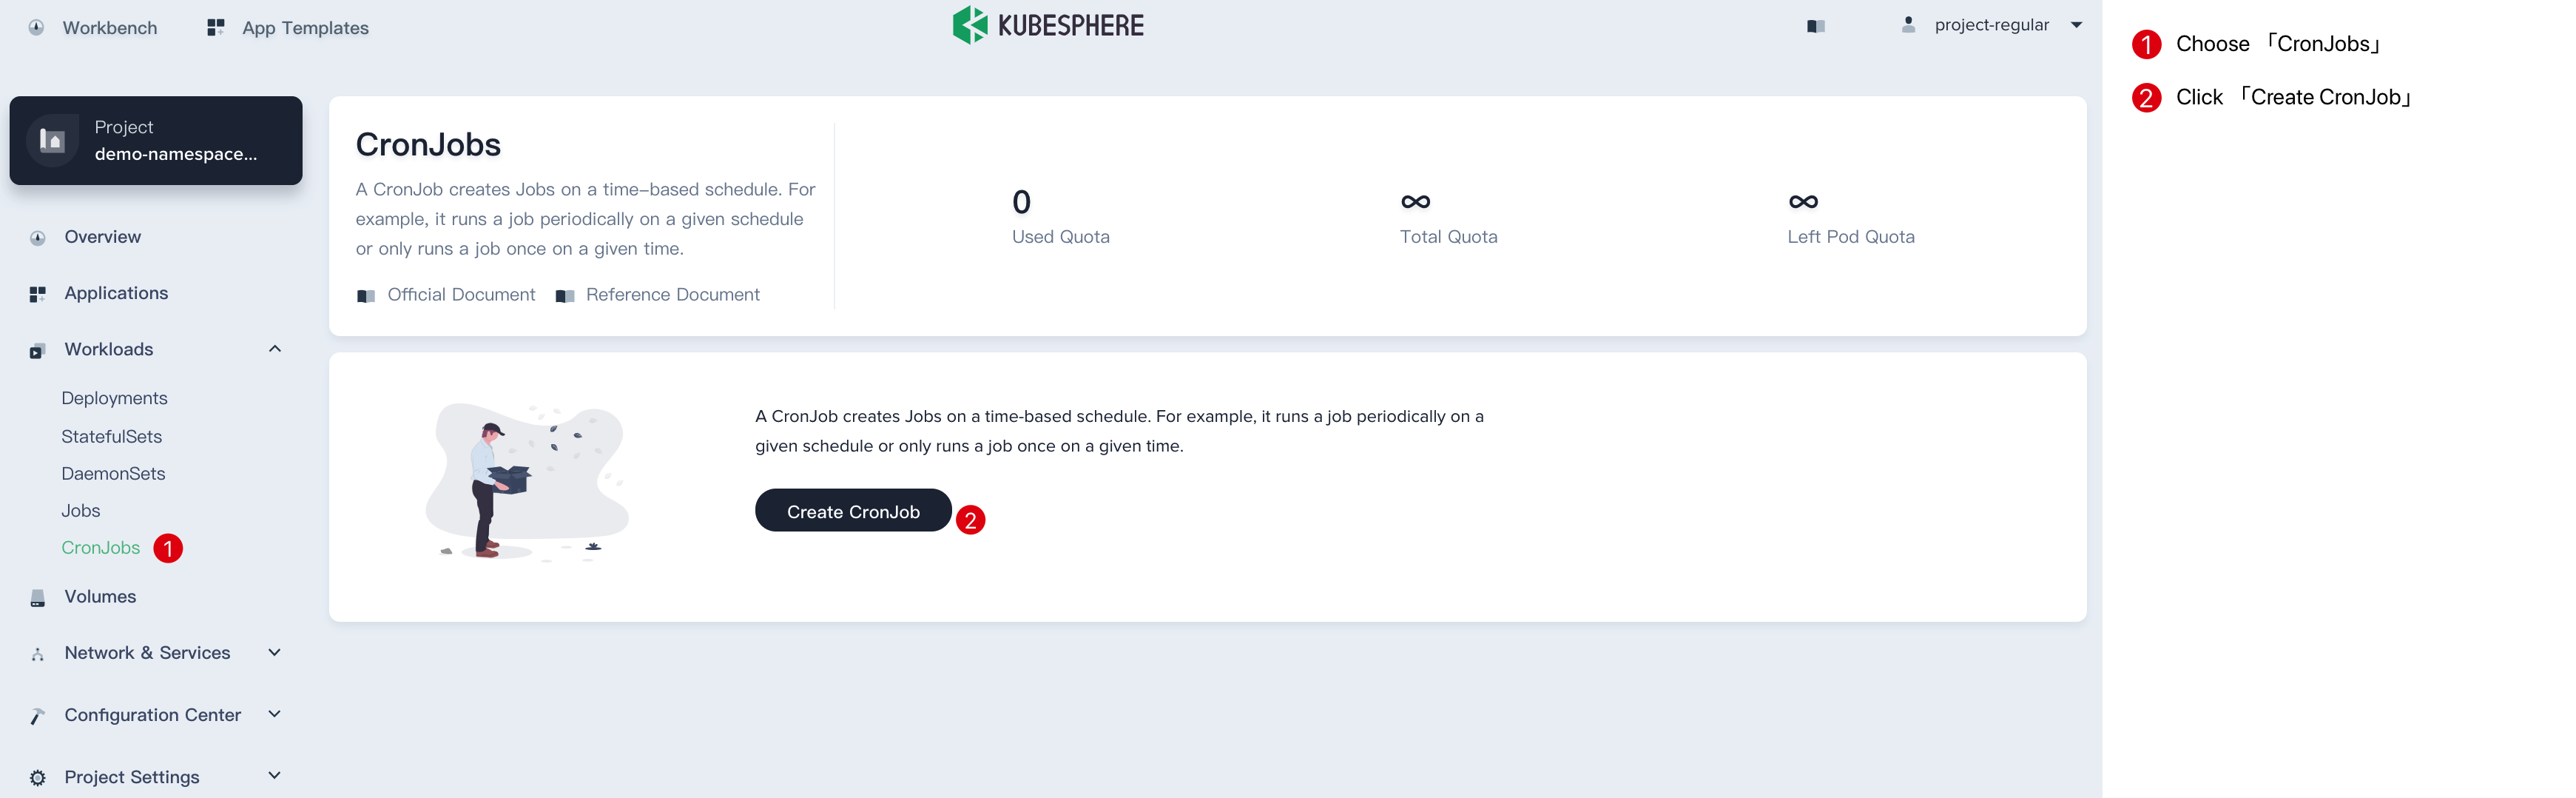
Sign in with project-regular, enter into one project (e.g. demo-namespace), then select Workload → CronJobs.
Step 1: Fill in the Basic Information
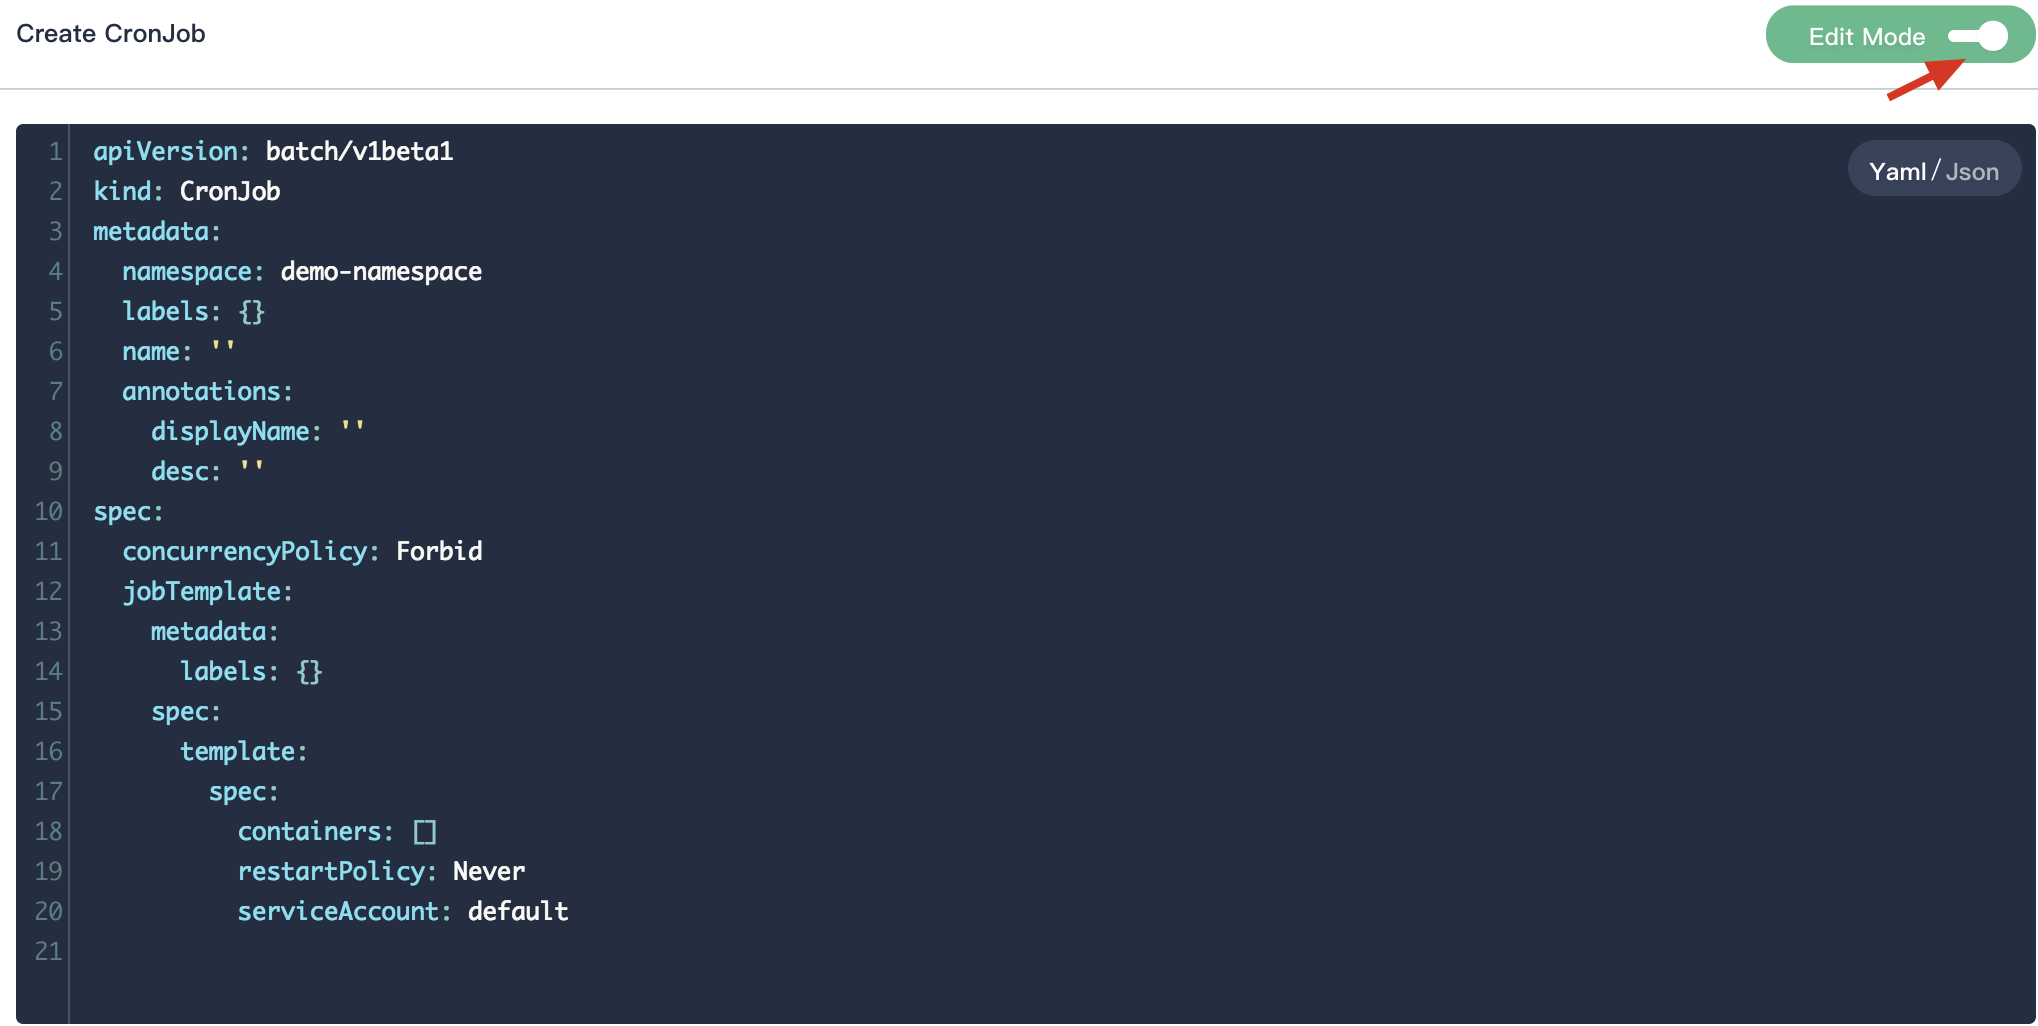
1.1. Click Create CronJob button, then fill in the basic information in the pop-up window. There are two ways to create a CronJob, i.e. fill in the creation table and edit mode. The following mainly introduces each step within creation table. If you prefer edit mode, you can click on the edit mode, it supports the yaml and json formats. Edit mode makes it easy for users who are used to command operations.
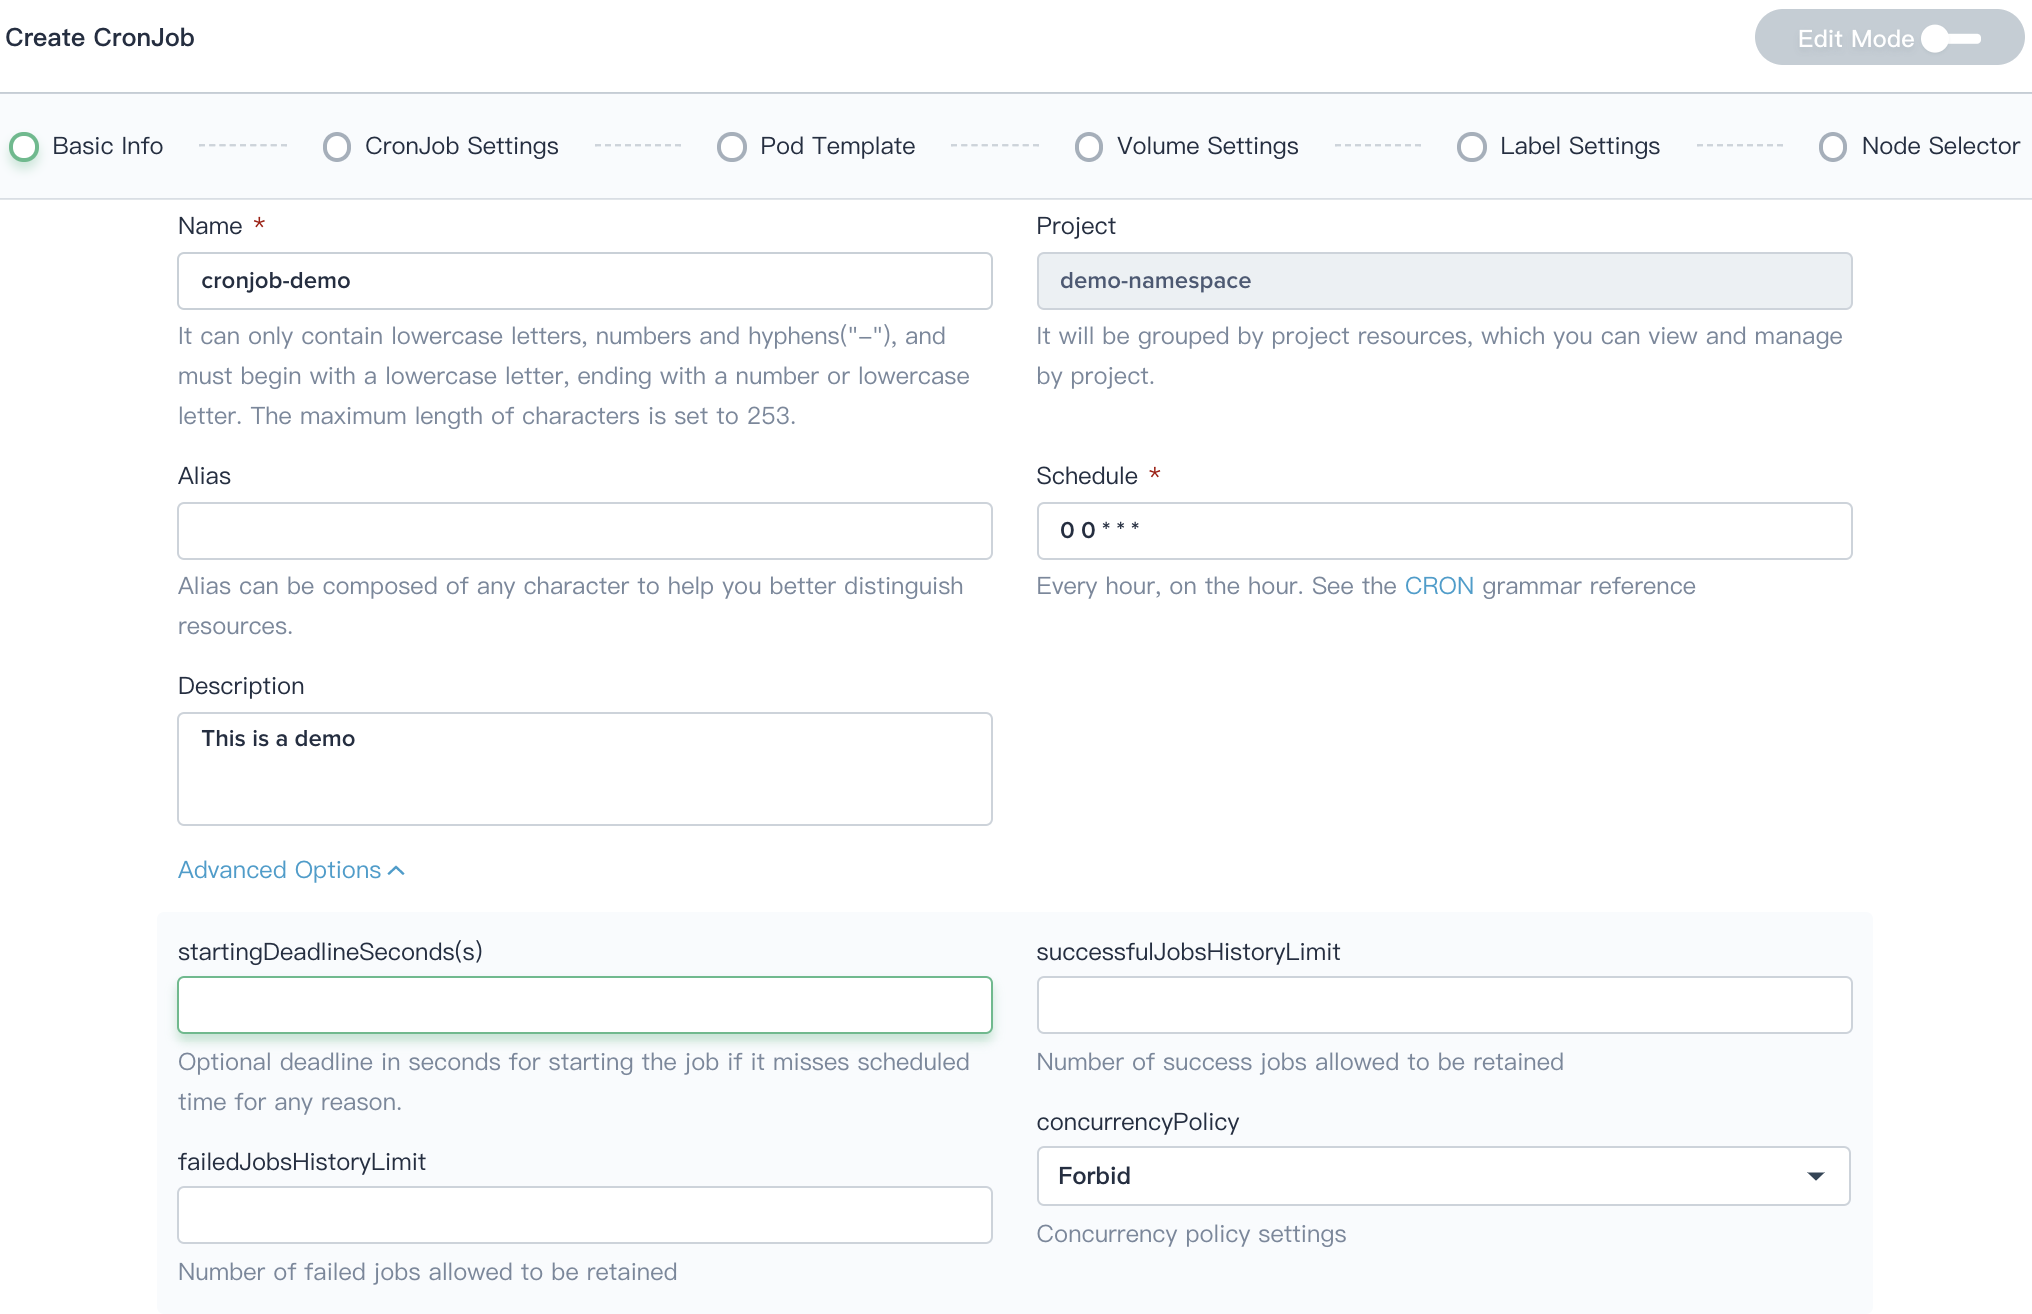
1.2. On the basic information page, enter the name of the CronJob, you can also fill in the description as required.
- Name: A concise and clear name for this CronJob, which is convenient for users to browse and search.
- Alias: Helps you better distinguish resources and supports Chinese.
- Schedule: It runs a job periodically on a given time-based schedule, reference CRON.
- Description: A brief introduction to this CronJob.
Click Advanced Options to set CronJob limitations, there are 4 fields as following:
- startingDeadlineSeconds: The controller counts how many missed jobs occurred from the value of startingDeadlineSeconds until now rather than from the last scheduled time until now.
- successfulJobsHistoryLimit and failedJobsHistoryLimitz: Optional, these fields specify how many completed and failed jobs should be kept.
-
concurrencyPolicy: Optional, it specifies how to treat concurrent executions of a job that is created by this cron job. the spec may specify only one of the following concurrency policies:
- Allow (default): The cron job allows concurrently running jobs
- Forbid: The cron job does not allow concurrent runs; if it is time for a new job run and the previous job run hasn’t finished yet, the cron job skips the new job run
- Replace: If it is time for a new job run and the previous job run hasn’t finished yet, the cron job replaces the currently running job run with a new job run
Click Next when you're done.
Step 2: CronJob Settings
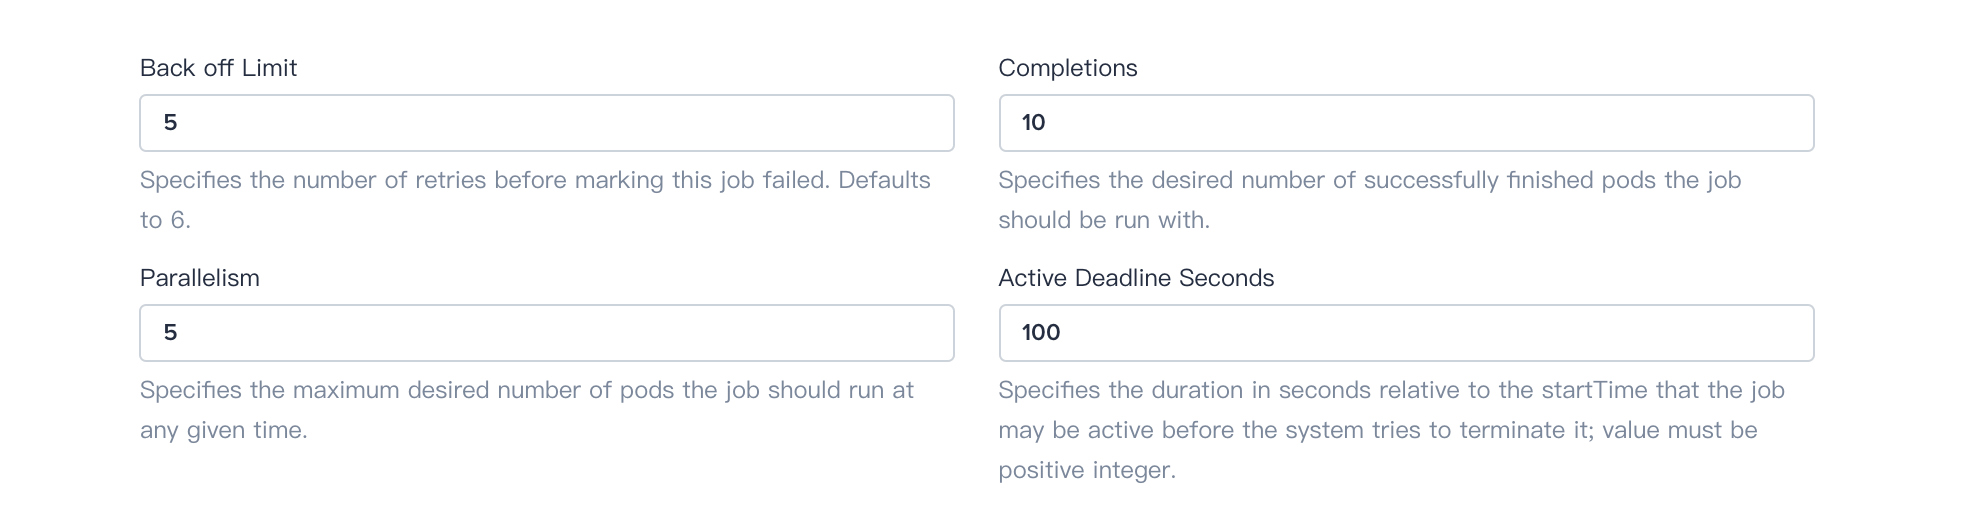
CronJob has specified following 4 kind of settings to handling pod lifecycle.
- BackoffLimit: Specify the number of retries before considering a Job as failed.
- Completions: Specify the desired number of successfully finished pods the job should be run with.
- Parallelism: Specify the maximum desired number of pods the job should run at any given time.
- Active Deadline Seconds: Apply to the duration of the job, no matter how many Pods are created. Once a Job reaches activeDeadlineSeconds, all of its Pods are terminated and the Job status will become type: Failed with reason: DeadlineExceeded.
Click Next to skip to the next step.
Step 3: Pod Template
3.1. RestartPolicy can only specify Never or OnFailure, when the job is not completed:
- If RestartPolicy specifies Never, the job creates a new Pod when the Pod fails, and the failed Pod does not disappear.
- If RestartPolicy specifies OnFailure, the job will internally restart the container when the Pod fails, instead of creating a new Pod.
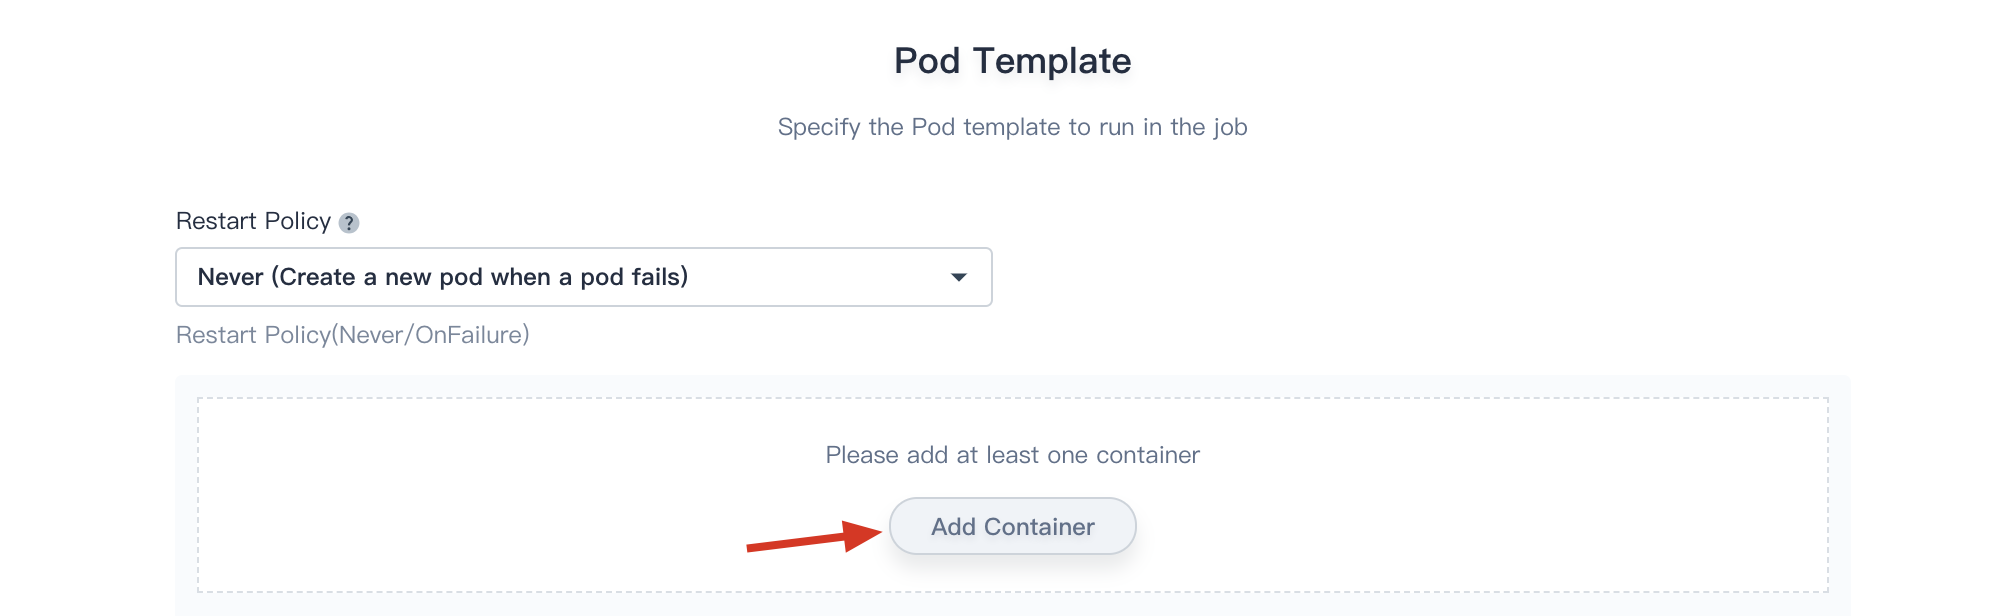
3.2. Click on the Add Container button, add a container image as needed. The image defined in the template is pulling from the DockerHub by default. Enter the name of the container and the corresponding image name. The image name generally needs to be specified with its tag, such as perl:5.24.4.
In order to realize the effective scheduling and allocation of resources in the cluster and improve resources utilization, the platform uses requests and limits to allocate resources. Request is usually the minimum resource requirement used by the container, and limit is usually the maximum value of the resource. Setting it to 0 means that there is no restriction on the resources used. Request can ensure that the pod has enough resources to run, and limit is to prevent a Pod from using resources unrestricted,causing other Pods to crash.
Table 1: CPU Quota Description
| Parameter | Description |
|---|---|
| Requests | A request is the amount of that CPU resources that the system will guarantee for the container, and Kubernetes will use this value to decide on which node to place the pod. |
| Limits | A limit is the maximum amount of CPU resources that Kubernetes will allow the container to use. |
Table 2: Memory Quota Description
| Parameter | Description |
|---|---|
| Requests | A request is the amount of that memory resources that the system will guarantee for the container, and Kubernetes will use this value to decide on which node to place the pod. |
| Limits | A limit is the maximum amount of memory resources that Kubernetes will allow the container to use. If the memory usage exceeds this limit, the container may be killed. |
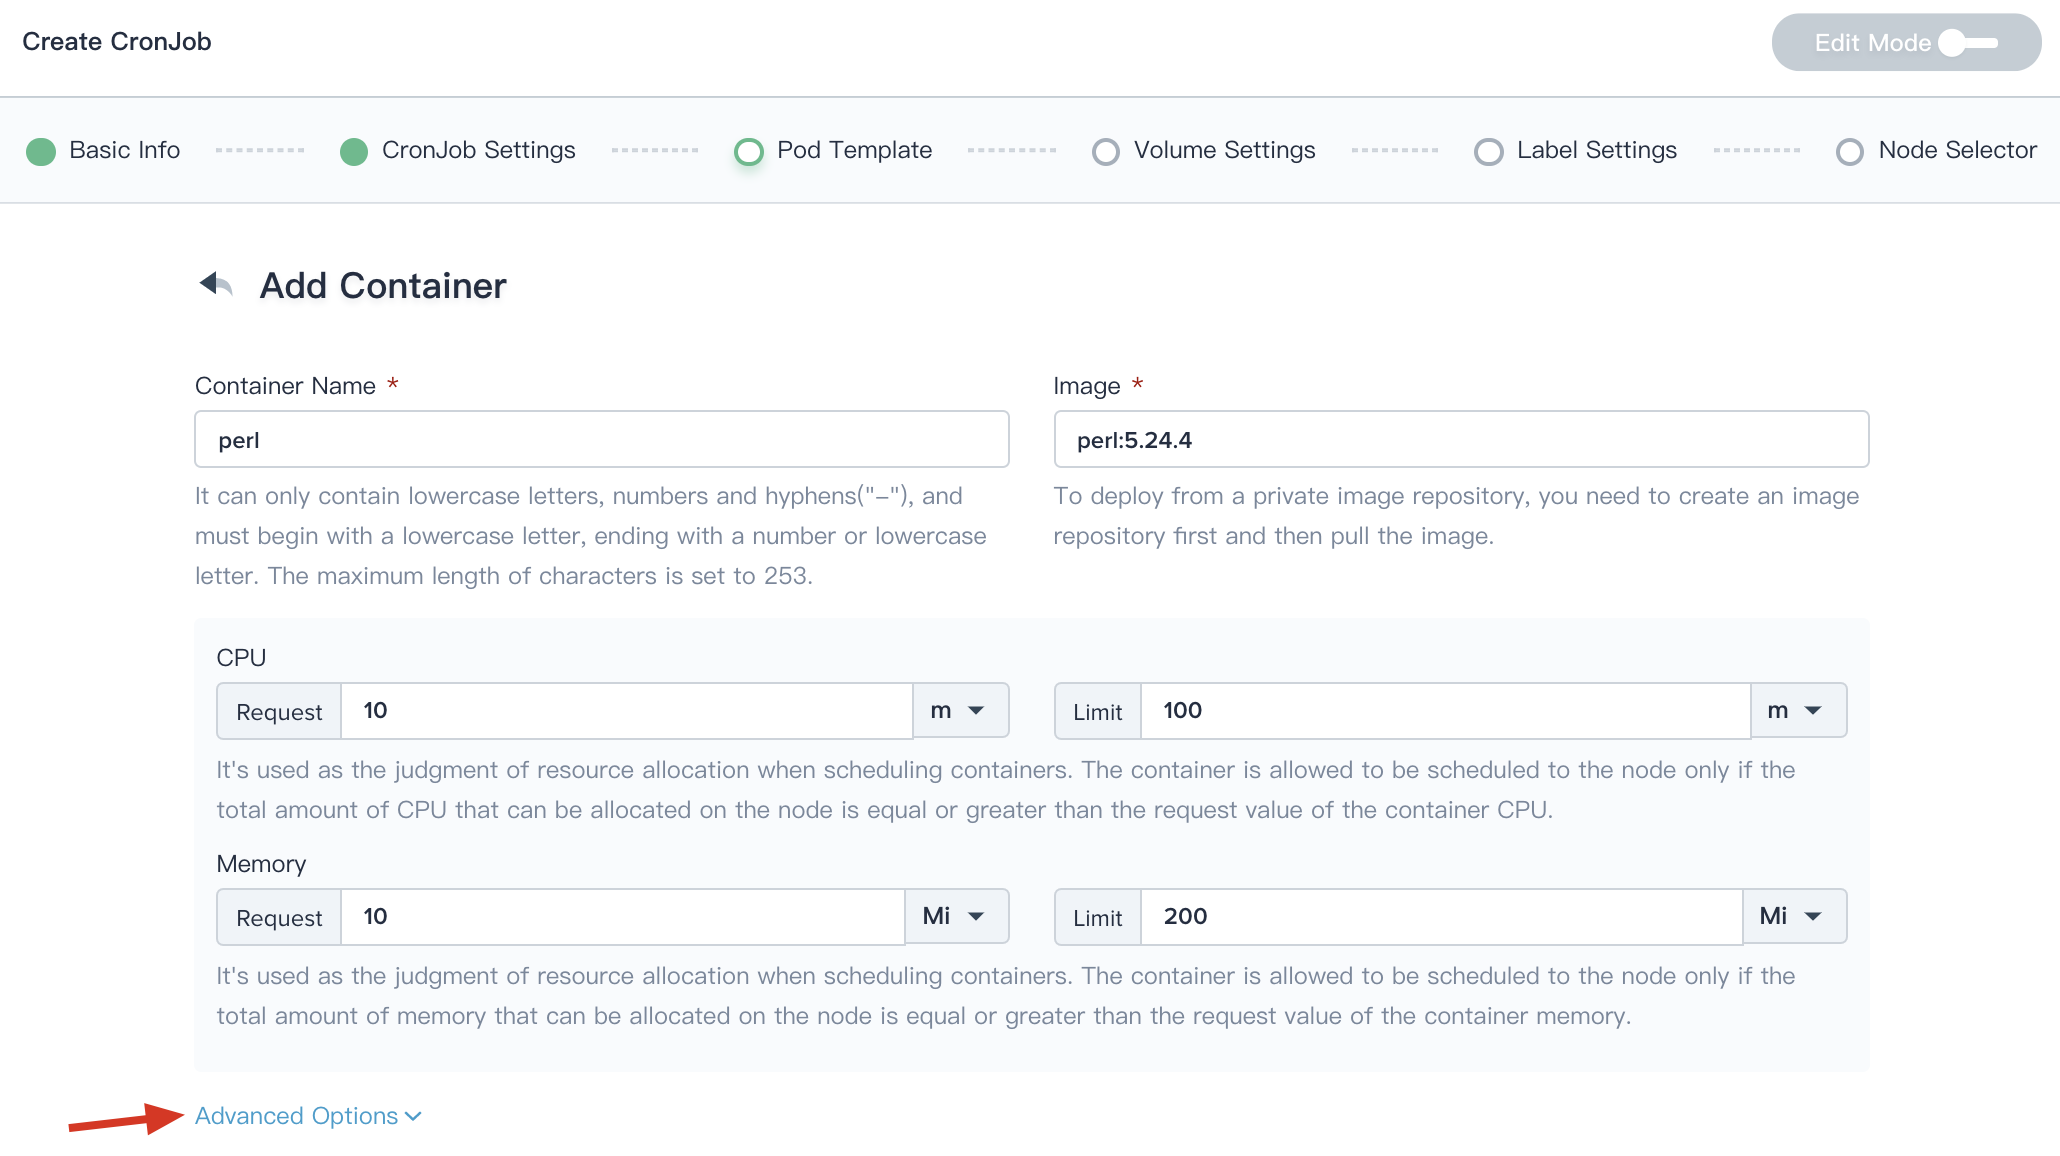
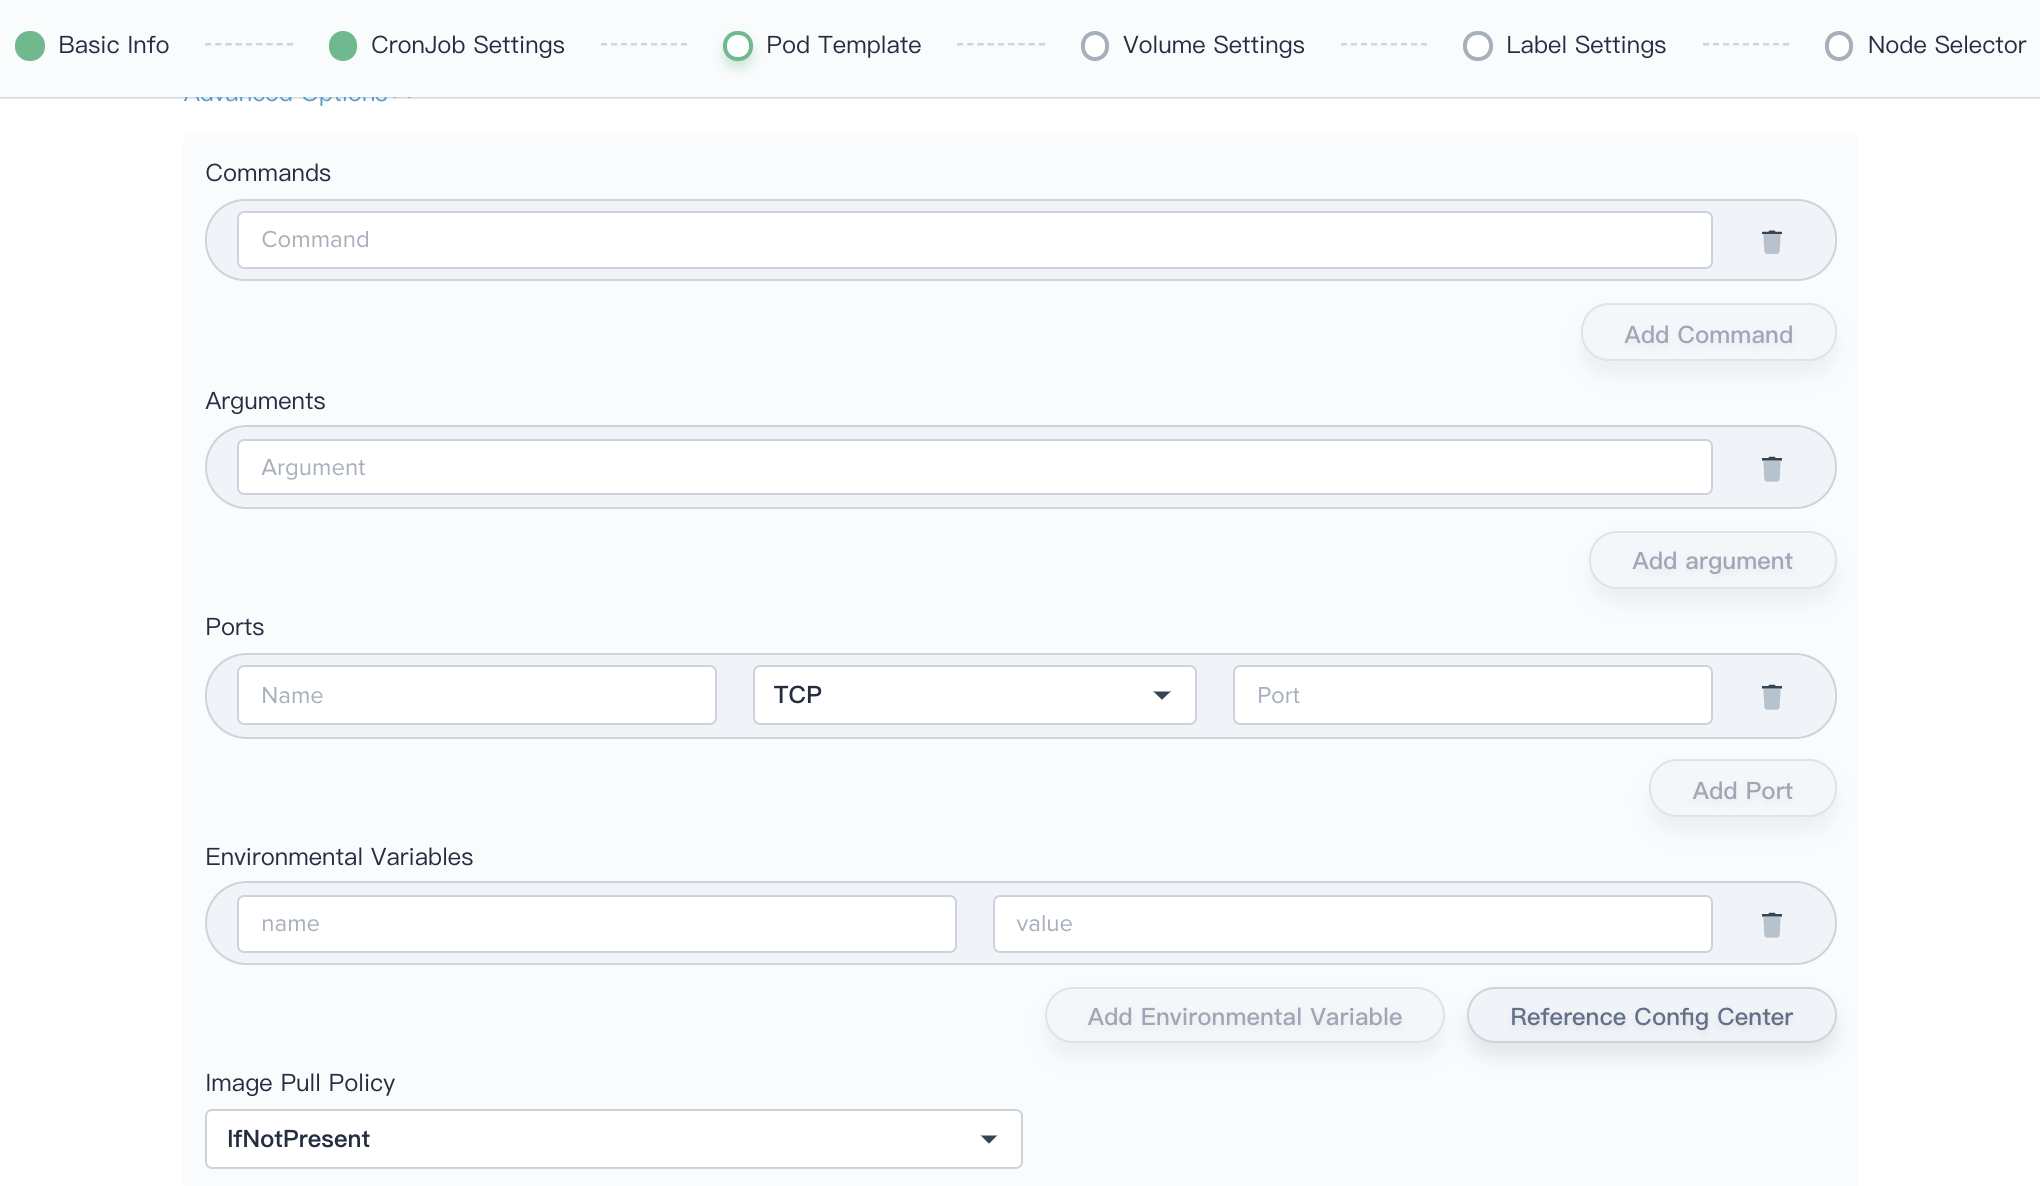
2.2. If the user has further requirements, click on the Advanced Options button.
- Command: In some cases, you need your command to run in a shell, see Kubernetes documentation.
- Arguments: You can defined the arguments directly by providing strings, see Kubernetes documentation.
- Ports: This is the container port that needs to be exposed. The port protocol can be TCP and UDP.
-
Environment Variables: you can define an argument for a Pod using any of the techniques available for defining environment variables, including ConfigMaps and Secrets, which has the same effect as the "ENV" in the Dockerfile, providing great flexibility for creating workloads.
- Reference Configuration Center: Supports adding Secret and ConfigMap as environment variables to save configuration data in the form of key-value pairs. See ConfigMaps and Secrets.
- Image Pull Policy: imagePullPolicy, the default image pull policy is IfNotPresent, the kubelet will no longer pull the image if the image already exists. If you need to pull the image frequently, set the pull policy to Always. If the container property imagePullPolicy is set to IfNotPresent or Never, the local image will be used first.
Click Save when setup is complete.
Then Click Next when you're done.
Step 4: Volume Settings
Job suppots totally 3 kind of volumes, i.e. Persistent Storage Volume, Temporary Storage Volume (EmptyDir) and Reference Configuration Center.
Persistent Volume
Persistent storage volumes can be used to save user's persist data, Add Existing Volume means you need to create volumes in advance, see Create Persistent Storage Volume.
Temporary Volume (EmptyDir)
The temporary storage volume represents emptyDir, which is first created when a Pod is assigned to a Node, and exists as long as that Pod is running on that node. When a Pod is removed from a node for any reason, the data in the emptyDir is deleted forever.
Reference Configuration Center
It also supports for configuring the key-value pairs in ConfigMap or Secret via reference configuration center.
A secret volume is used to pass sensitive information, such as passwords, to Pods. Secret volumes are backed by tmpfs (a RAM-backed filesystem) so they are never written to non-volatile storage.
ConfigMap is used to store configuration data in the form of key-value pairs. The configMap resource provides a way to inject configuration data into Pods. The data stored in a ConfigMap object can be referenced in a volume of type configMap and then consumed by containerized applications running in a Pod.
- Set the value of the environment variable
- Set command parameters in the container
- Create a config file in the volume
Note: You need to create a Secret or ConfigMap in the Configuration Center before you can use it, see Create Secret and Create ConfigMap.
Click on the Next button when you're done.

Step 5: Label Settings
Labels are key/value pairs that are attached to objects, such as pods. Labels are intended to be used to specify identifying attributes of objects that are meaningful and relevant to users. Labels can be used to organize and to select subsets of objects, each object can have a set of key/value labels defined, such as relase: stable ; tier: cronjob.

Click on the Next button when you're done.
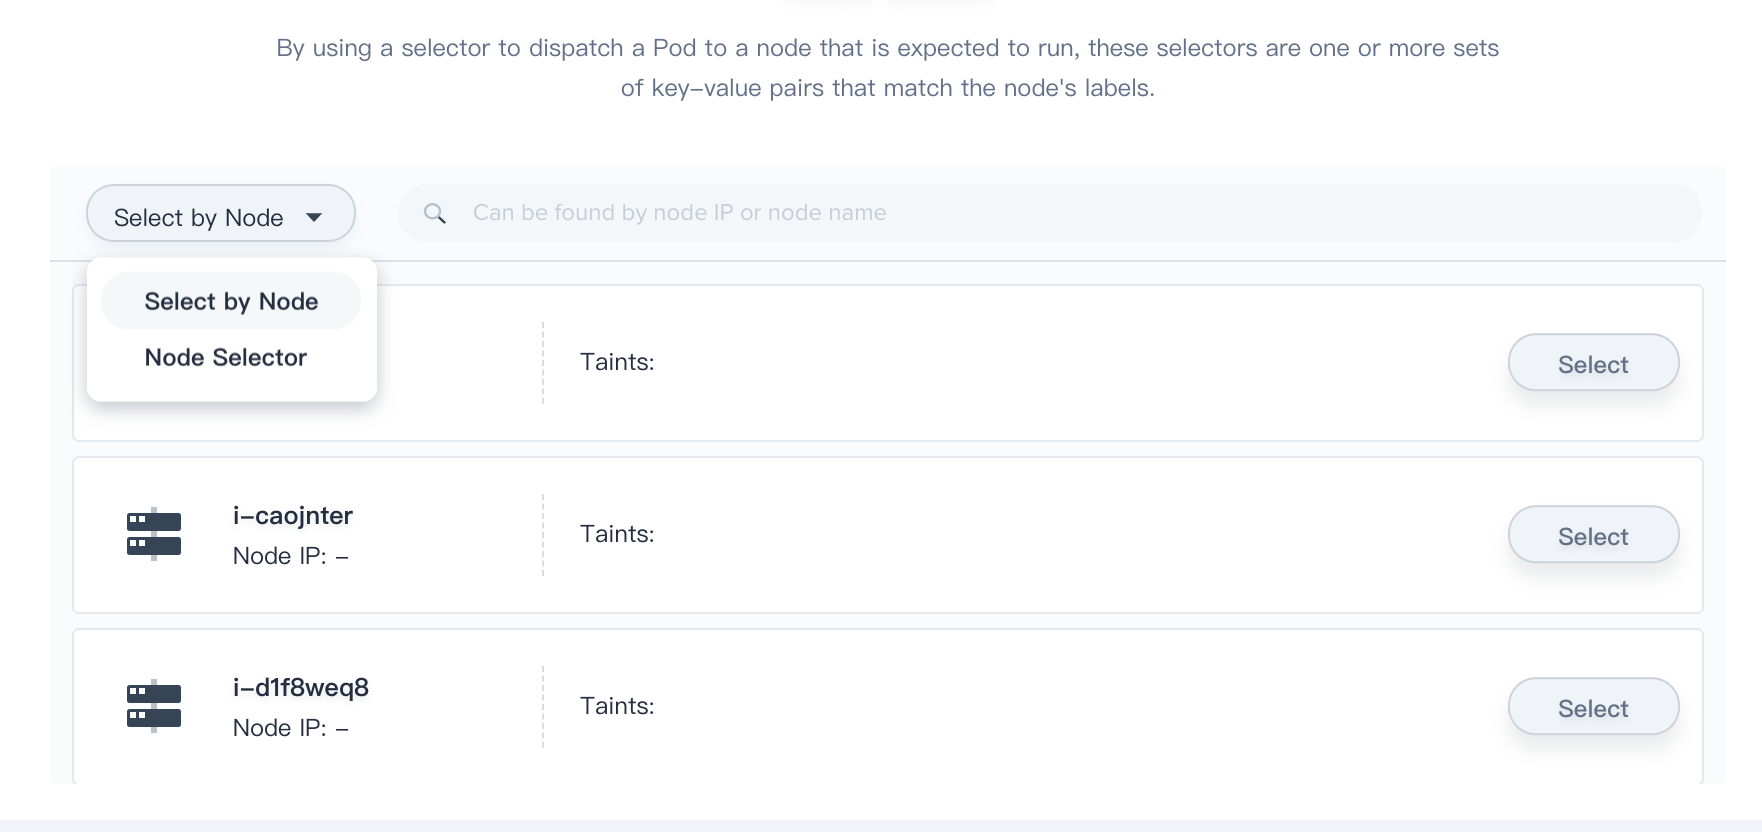
Step 6: Node Selector
For the pod to be eligible to run on a node, the node must have each of the indicated key-value pairs as labels (it can have additional labels as well). The user can specify the node on which the Pod is expected to run by setting one or more sets of key-value pairs or select node directly. When not specified, the Pod will likely be scheduled to any node in the cluster that meets the resource scheduling criteria.
Click Create to complete the creation of the CronJob. The status display “Updating” is due to it's pulling the image. After the image pull succeeds, the status will display “Running”.